Office 365 tenant to tenant migration, also called cross-tenant migration, is the process of moving emails and data from one Microsoft Office 365 account to another. This generally happens when companies combine, acquire, buy another company, rebrand, or go through big changes in how they’re organized. However, in this article, we’ll show you the way to prepare Office 365 accounts for a smooth migration with minimal disruption to business operations.
Microsoft 365 is a tool numerous businesses use all over the world, so when things like merges or any changes needed in an O365 tenant, moving data from one account to another becomes very important. But this kind of migration needs careful planning to make sure everything works right, and that nothing is lost or broken.
Although moving Office 365 data from one account to another might feel hard, it’s possible to do it well with the right preparation.However, you can make the move much easier, If you plan ahead and take it step by step. This guide gives you tips and advice on how to do the migration so everything is set up rightly once the move is complete.
Table of Content
- 1 What is Office 365 Tenant to Tenant Migration
- 1.1 How to Perform Microsoft Office 365 Tenant to Tenant Migration?
- 1.2 Major Reasons for Cross-Tenant Migration in Office 365
- 1.3 Understanding Microsoft 365 Tenants and Migration factors: Key Apps and Services Across Office 365 Subscription Plans
- 1.4 Two Ways to Migrate Office 365 Data
- 1.5 Prerequisites for Source and Target Tenants
- 1.6 Create the Migration Application and Secret Value in the Target (Destination) Tenant
- 1.7 Create the Exchange Online Migration Endpoint and Organization Relationship in the Target (Destination) Tenant
- 1.8 Accept the Migration Application and Configure the Organization Relationship in the Source Tenant
- 1.9 Steps to Create Mail Users in the Target Tenant
- 1.10 Steps to Find ExchangeGuid and ExchangeLegacyDN of the Source Mailbox
- 1.11 Add ExchangeGuid and ExchangeLegacyDN in the Target Tenant
- 1.12 Test the Migration Server Availability
- 1.13 Assign Licenses to Mail Users in the Target Tenant
- 1.14 Conclusion
- 1.15 FAQ
What is Office 365 Tenant to Tenant Migration
When you need to move mailboxes from one Office 365 account to another, you’re performing a tenant-to-tenant migration. This involves transferring all data from one Office 365 domain to another, including emails, contacts, calendars, and any rules set up. Although, the process can be quite complex and requires knowledge of Windows PowerShell, a tool used to manage and automate tasks within Office 365.
How to Perform Microsoft Office 365 Tenant to Tenant Migration?
To move data between Office 365 accounts, you’ll use tools like Windows PowerShell, the Microsoft 365 Admin Center, and the Azure Web Portal. It’s really important to follow each step very carefully—
The first thing you need to do is to make sure that you have Global Admin access in both Office 365 accounts. If you don’t have the necessary permissions, it is good to request access from your administrator.
Major Reasons for Cross-Tenant Migration in Office 365
There are various factors that may necessitate cross-tenant migration in Office 365. Some of the primary reasons include:
- Combinations and Accessions( M&A) – When two companies combine or one company buys another, it’s important to combine their Office 365 accounts into one. This makes it easier to manage everything in one place, rather than having separate accounts for each company.
- Rebranding – occasionally, companies change their name or sphere as part of a rebranding trouble. This might mean they need to move their data to a new Office 365 account that matches their new name or identity.
- Multiple Tenants – If a company has multiple Office 365 tenants, managing them is quite tough. Moving everything to one account( tenant) can simplify, improve security and make it easier to handle.
- Compliance and Governance – Certain businesses need to follow rules and regulations, which may result them to resettle or shift their data to a different Office 365 tenant to meet legal or security norms.
Understanding Microsoft 365 Tenants and Migration factors: Key Apps and Services Across Office 365 Subscription Plans
The Office 365 subscription plan you choose will determine which apps and services are available to you as a Microsoft 365 tenant. For example, the Microsoft 365 Business Basic Plan grants you access to the following services and apps:
- Exchange Online
- SharePoint
- Outlook 365
- OneDrive for Business
- Word
- Excel
- PowerPoint
- Microsoft Teams
- Bookings
- Forms
- Lists
- Planner
When performing an Office 365 tenant to tenant migration, it’s crucial to consider all the apps and services that need to be moved. This means migrating data not only from Outlook 365 mailboxes but also from services like OneDrive for Business, Teams, SharePoint.
Two Ways to Migrate Office 365 Data
There are two main ways to carry out the migration:
- Manual Migration – This method migrating data from each application individually. While it provides you complete control over the process, it can take a long time and requires close monitoring to ensure that no data is lost.
- Automated Migration Tools – Using specialised tools to automatically relocate data speeds up the process and reduces risk.
Using automated tools is typically more efficient and dependable. To ensure that everything runs properly, plan carefully, test the process before fully transferring, and consider seeking assistance from professional tools or service providers.
Prerequisites for Source and Target Tenants
Before starting the office 365 tenant to tenant migration, there are several tasks that must be completed in both the source and target tenants. Below, we will outline the necessary steps to help guide you through this process.
Step 1: Create a Mail-Enabled Security Group in the Source Tenant
Follow the steps below to create a mail-enabled security group in the source tenant.
- Log in to Office.com using your Admin credentials.

- In the left sidebar, select Teams and Groups, then click on Active Teams and Groups.

- In the Active Teams and Groups window, click on Add a Group.

- A new window will appear asking for the group type. Select Mail-enabled security, then click Next.

- Enter the Group name and description, then click Next.

- Assign group owners by clicking Assign Owners. You can add one or more owners. Select the owner(s) and click Add.
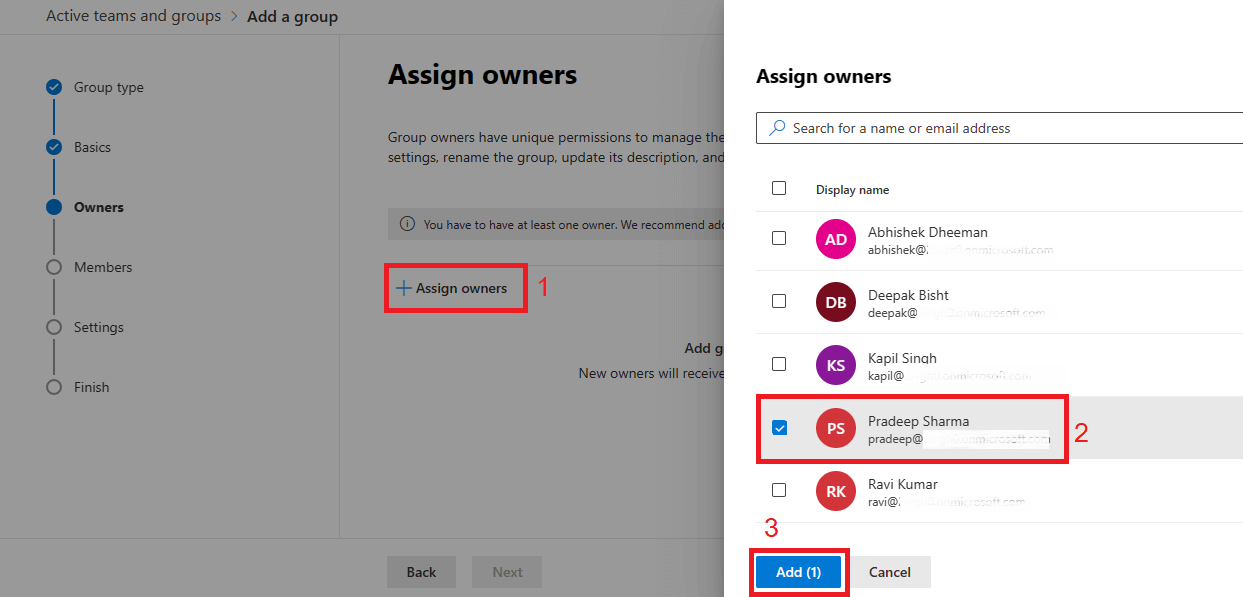
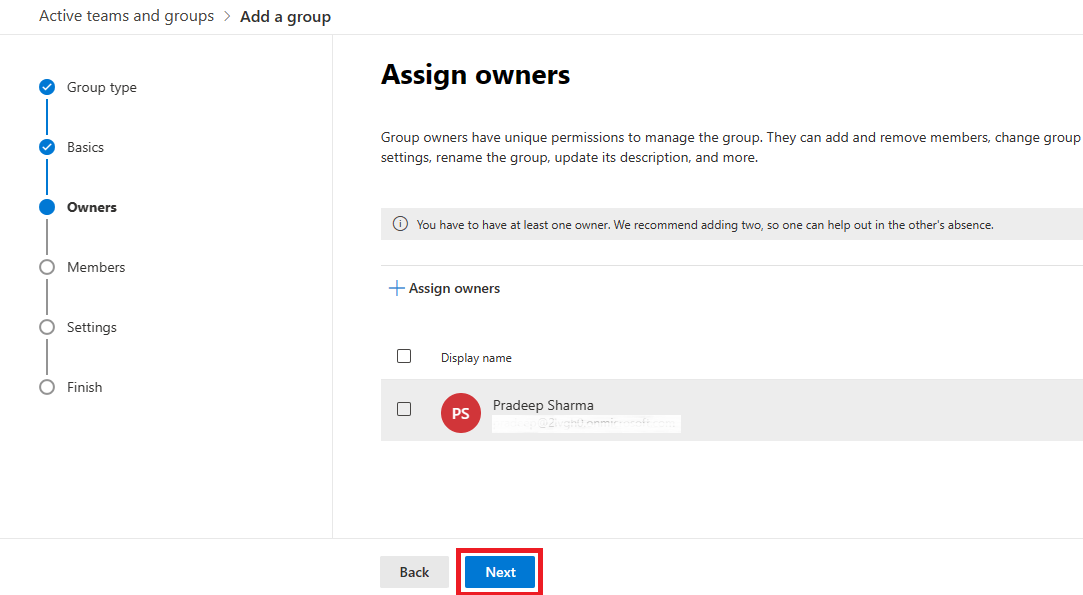
- The assigned owners will appear in the list. Click Next to proceed.
- Now, add the members for migration. Click Add Members, and a window will open showing a list of users. Select the members whose mailboxes you want to migrate, then click Add.
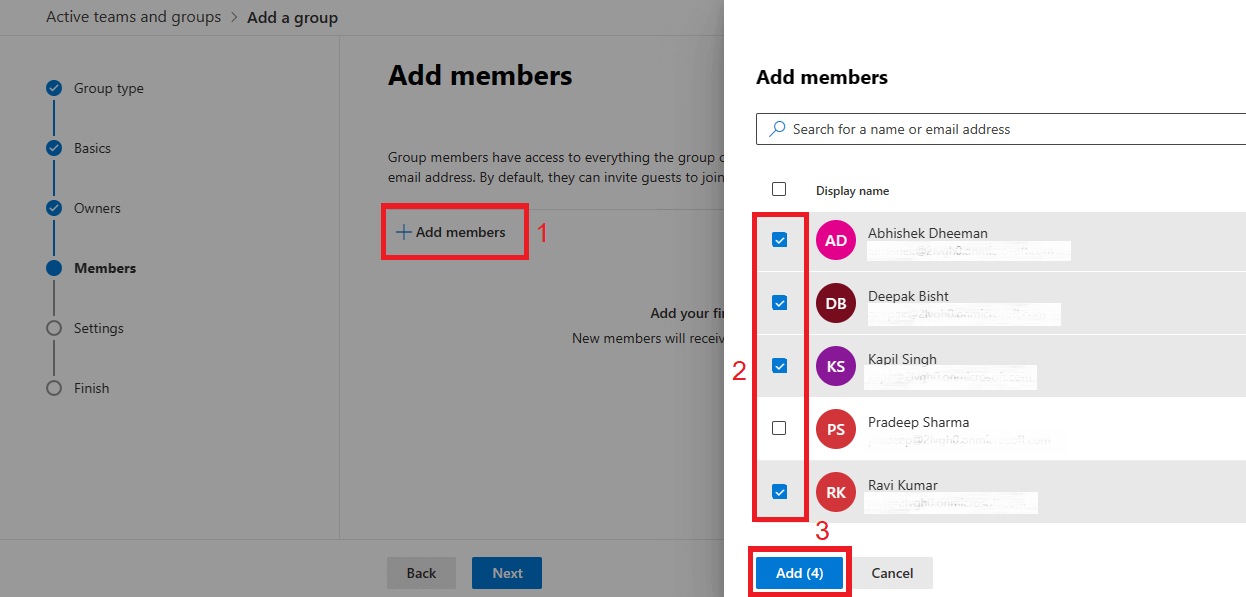
- Once the members are added, the list will be shown. Click Next to proceed.
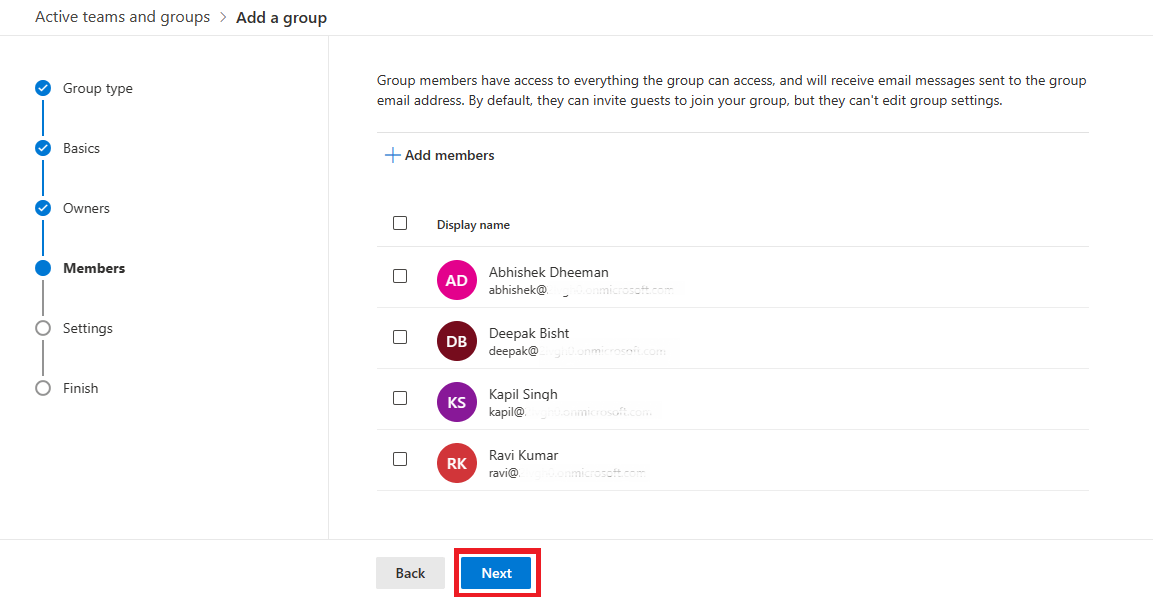
- Enter the Group email address in the required field and click Next.
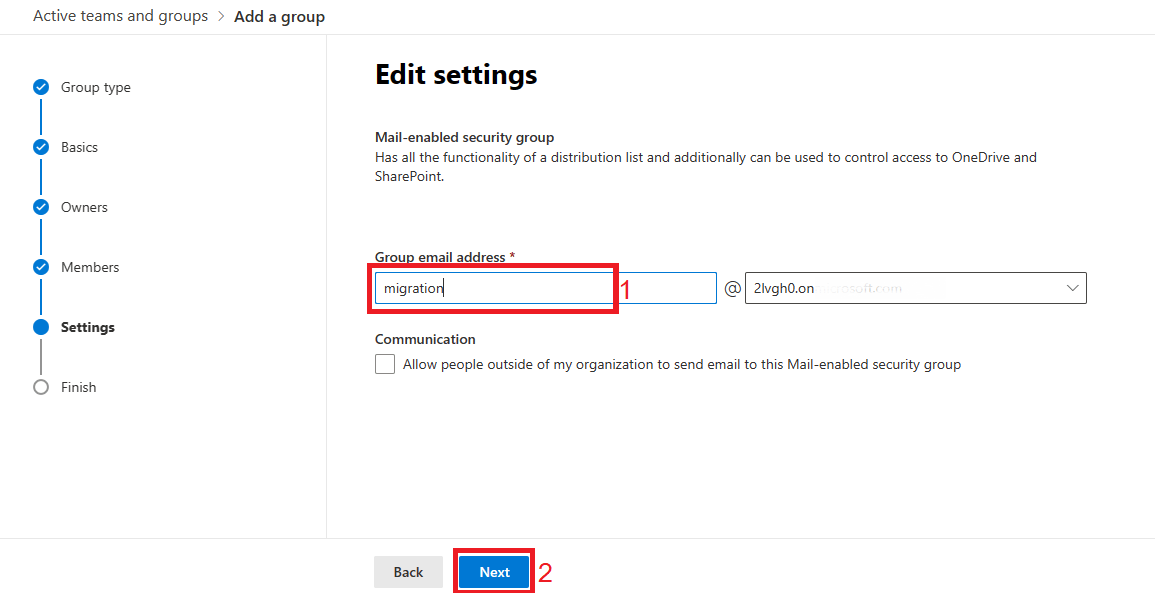
- A review window will appear, displaying all the details. Review the information and click Create Group to finalize the process.

Your Mail-enabled security group has now been created.
Be sure to copy the group name and email address and save them for later use.
Step 2: Find and Save the Tenant IDs of Both Source and Target Tenants
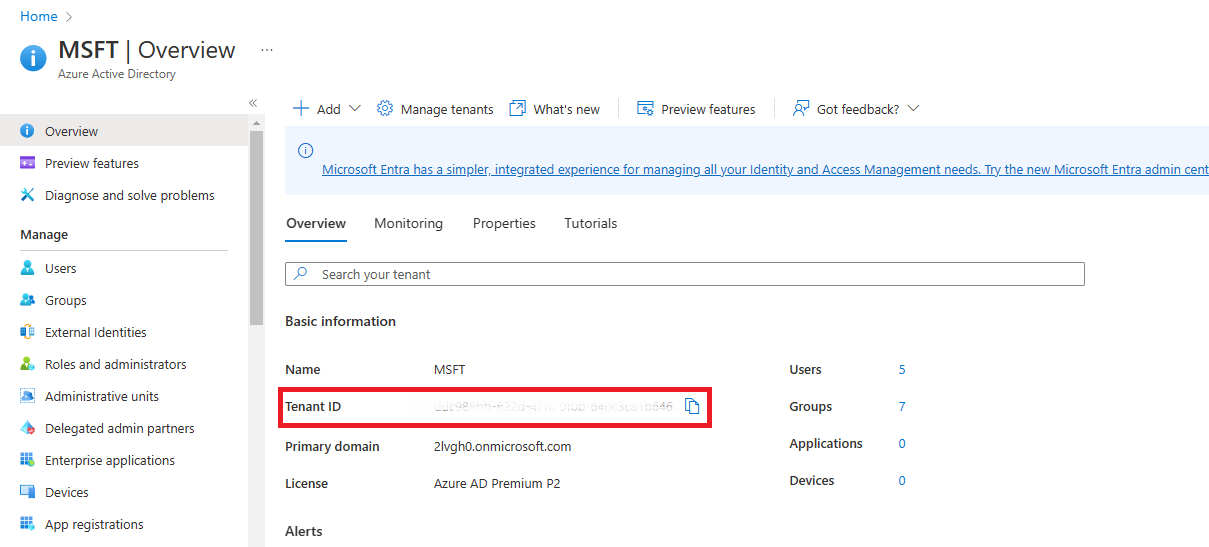
To proceed, you need to locate and save the Tenant ID for both the source and target tenants.
Follow these steps:
- Visit the URL below for both the source and target accounts:
https://portal.azure.com/#view/Microsoft_AAD_IAM/ActiveDirectoryMenuBlade/~/Overview - In the Basic Information section, copy the Tenant ID and save it for future reference.
Create the Migration Application and Secret Value in the Target (Destination) Tenant
First: Create or Register an Application in the target tenant to facilitate the migration process.
- Visit https://portal.azure.com and log in using the admin credentials for the target tenant to access the Azure AD portal.
- In the Azure portal, click on View under Manage Azure Active Directory.
Manage Azure Active Directory

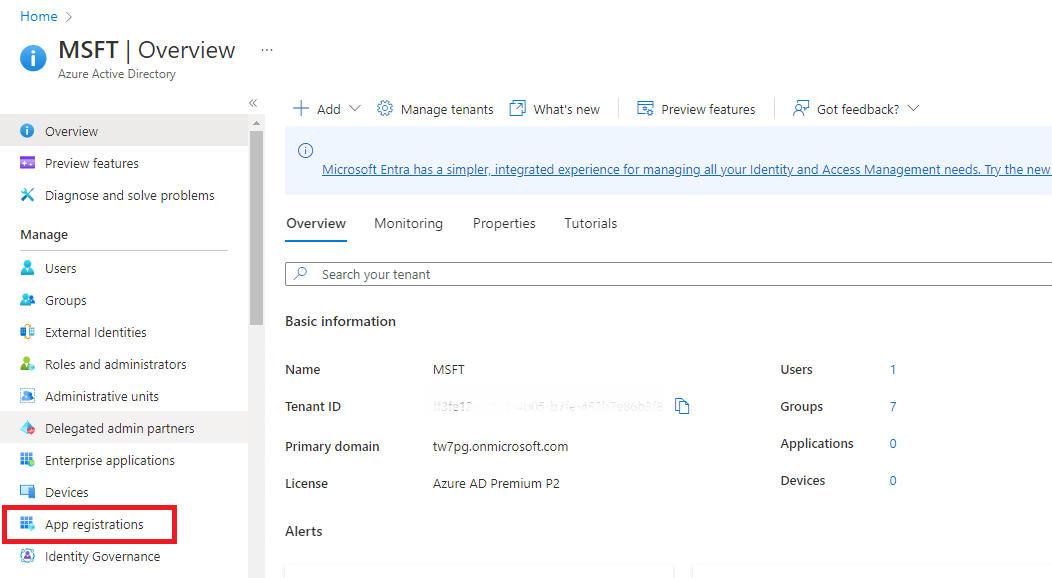
- In the left sidebar, click on App registrations to create a new application.
App registrations
- Click on New registration to begin the application registration process.
New registration

- The Register an application window will appear. Enter a name for the application. In the Supported account type, choose Accounts in any organizational directory (Any Azure AD directory – Multitenant). Under Redirect URI options, select Web as the platform and enter the URL: https://office.com/. Afterward, click Register.
Register app

You’ll see the application creation process in the top right corner.
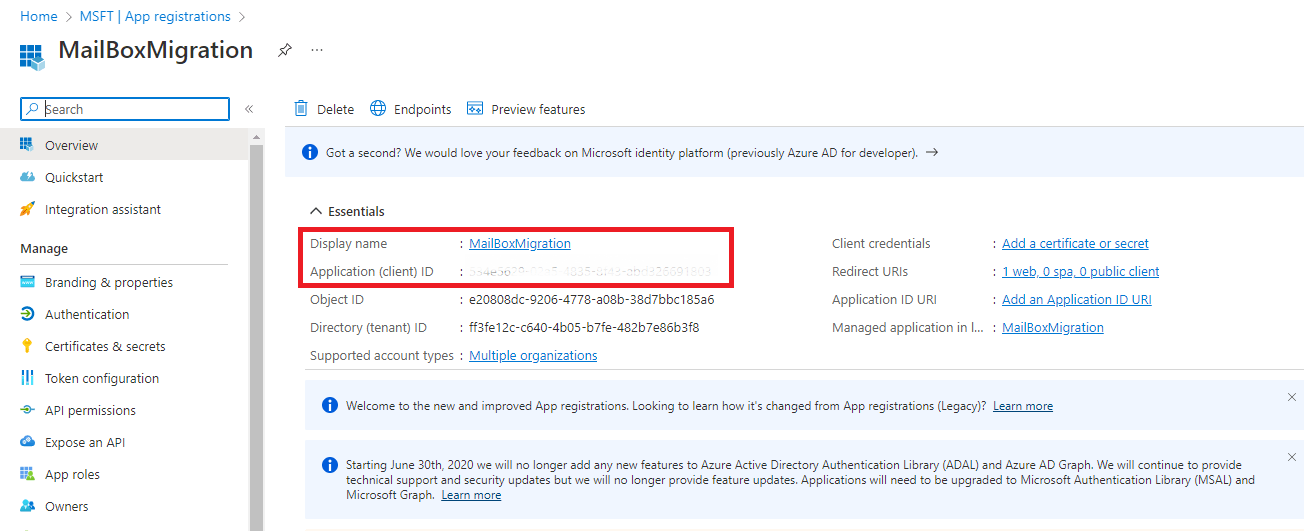
Once the registration is complete, you’ll be directed to your application page. Be sure to save the Application name and Application (client) ID, as you will need them later.
Second: Assign API Permissions For Mailbox Migration
- In the left sidebar, click on API Permissions.
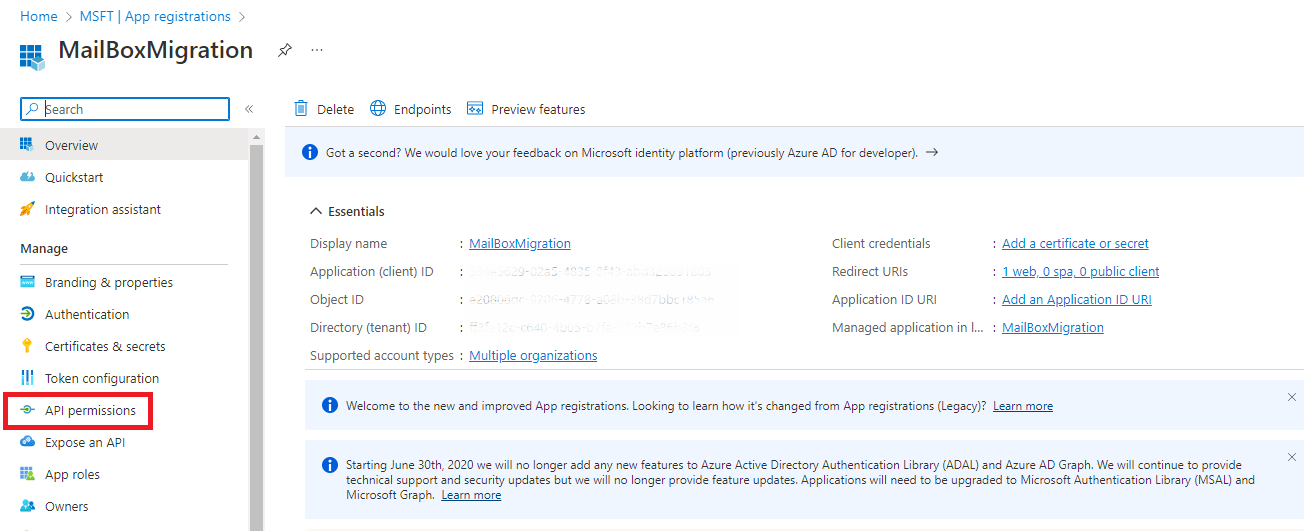
- The API Permissions window will appear on the right side. By default, User.Read permission is assigned, which is not needed for migration. Click on the three dots next to it and select Remove to delete the permission.

- Next, you need to assign the mailbox migration permission. Click on Add a permission.

- The Request API permissions window will open. Select APIs my organization uses, then search for Office 365 and choose Office 365 Exchange Online.
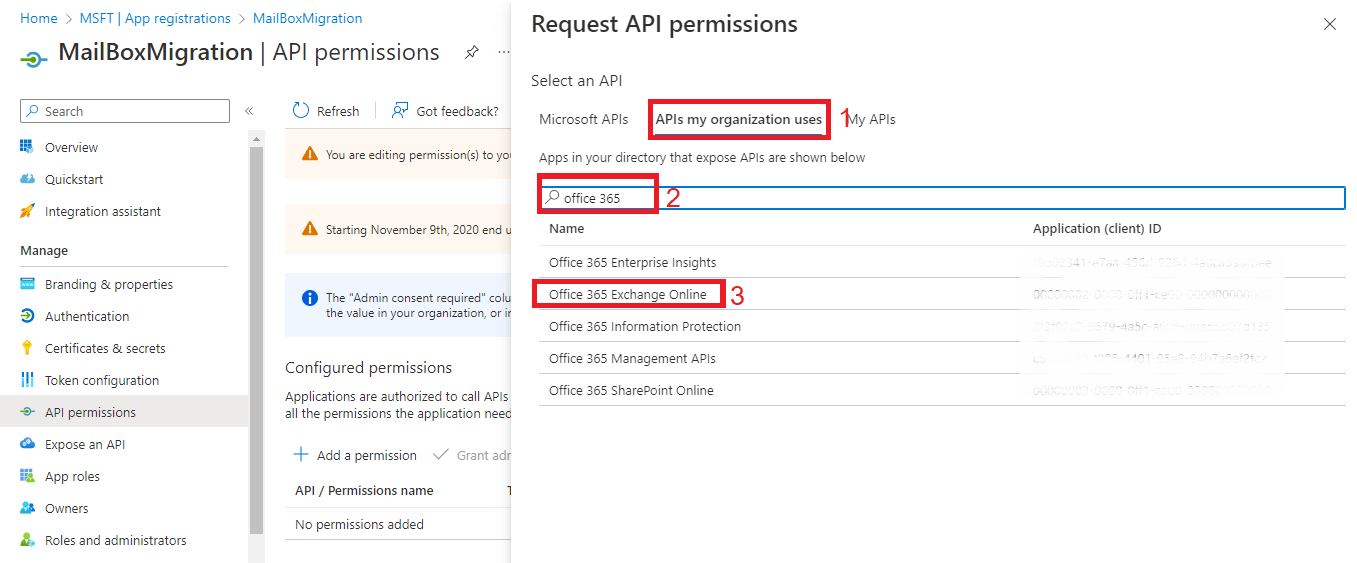
- In the settings for Office 365 Exchange Online, click on Application permissions.

- Search for Mailbox, select Mailbox.Migration, and then click Add permissions.

The Mailbox.Migration permission will now be assigned to the application.
Third: Add a New Client Secret
- Click on Certificates and secrets in the left sidebar.

- Click on New client secret to create a secret value for the application. The Add a client secret window will appear on the right side. Provide a description for the client secret and click Add

- The client secret will now be created. Be sure to copy the secret value and save it securely, as it will not be shown again.
Fourth: Grant Admin Consent for MSFT
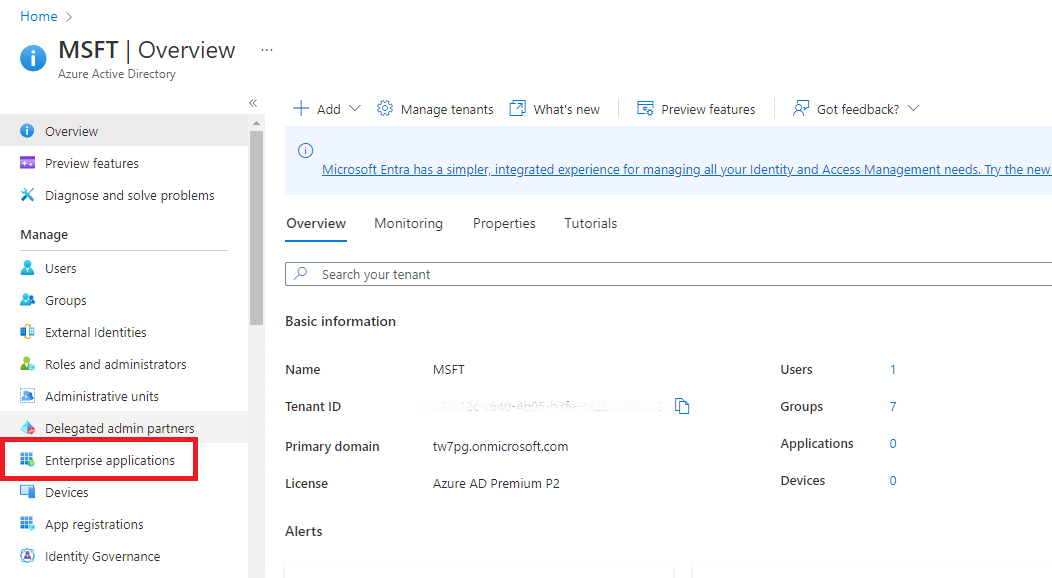
- Since the mailbox move permission requires admin consent, go back to Azure Active Directory. Click on Enterprise applications.
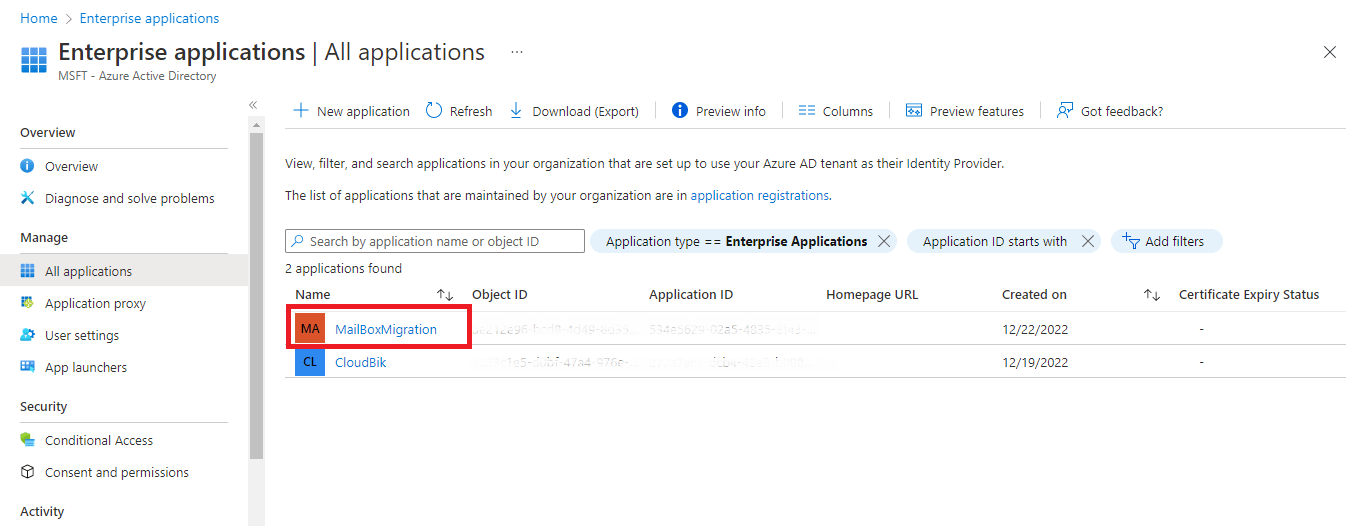
- Select the application that you created earlier.
- In the left sidebar, click on Permissions and then select Grant Admin Consent for MSFT.

- A confirmation window will appear. Click Accept to grant admin consent.
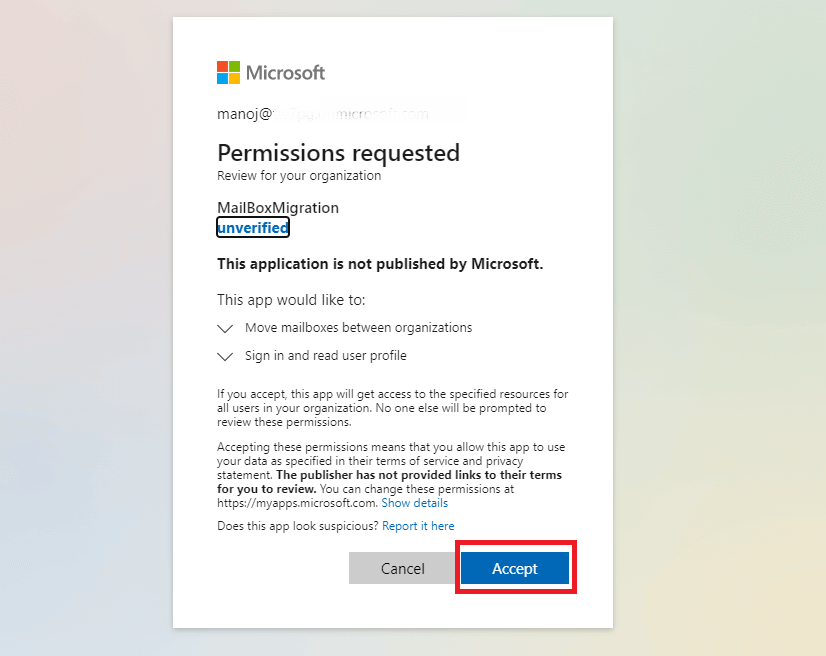
- Refresh the page, and you will now see that the permission has been granted through admin consent.

Create the Exchange Online Migration Endpoint and Organization Relationship in the Target (Destination) Tenant
- Search for Windows PowerShell in the Start menu and click on Run as Administrator.

- By default, the execution policy in Windows PowerShell is set to “Restricted.” To allow the running of any PowerShell scripts, users need to change the execution policy to “Unrestricted” by executing the following command.
Set-ExecutionPolicy Unrestricted
Type Y and click enter when asking for permission.

- Connect to Exchange Online PowerShell using the login credentials of the target tenant.
- To create a new migration endpoint for the tenant to tenant mailbox migration, execute the following PowerShell script.
# Enable customization if tenant is dehydrated
$dehydrated=Get-OrganizationConfig | select isdehydrated
if ($dehydrated.isdehydrated -eq $true) {Enable-OrganizationCustomization}
$AppId = "[guid copied from the migrations app]"
$Credential = New-Object -TypeName System.Management.Automation.PSCredential -ArgumentList $AppId, (ConvertTo-SecureString -String "[this is your secret password you saved in the previous steps]" -AsPlainText -Force)
New-MigrationEndpoint -RemoteServer outlook.office.com -RemoteTenant "[sourcetenant.onmicrosoft.com]" -Credentials $Credential -ExchangeRemoteMove:$true -Name "[the name of your migration endpoint]" -ApplicationId $AppId
Note: Replace [guid copied from the migration app] with the application ID and [this is your secret password you saved in the previous steps] with the client secret value. Also, replace [the name of your migration endpoint] with the migration endpoint name you wish to use. Be sure to save the endpoint name, as it will be needed later.

- To create or edit the organization relationship object in the source tenant, execute the following script in PowerShell while logged into the target tenant account
$sourceTenantId="[tenant id of your trusted partner, where the source mailboxes are]"
$orgrels=Get-OrganizationRelationship
$existingOrgRel = $orgrels | ?{$_.DomainNames -like $sourceTenantId}
If ($null -ne $existingOrgRel)
{
Set-OrganizationRelationship $existingOrgRel.Name -Enabled:$true -MailboxMoveEnabled:$true -MailboxMoveCapability Inbound
}
If ($null -eq $existingOrgRel)
{
New-OrganizationRelationship "[name of the new organization relationship]" -Enabled:$true -MailboxMoveEnabled:$true -MailboxMoveCapability Inbound -DomainNames $sourceTenantId
}
Note: Replace [tenant id of your trusted partner, where the source mailboxes are] with the Source Tenant ID that you copied earlier. Replace [name of the new organization relationship] with the desired name for the Organization Relationship. Make sure to save the relationship name, as it will be needed later.

Accept the Migration Application and Configure the Organization Relationship in the Source Tenant
- First, log in to your Source Tenant account using admin credentials.
- Next, copy and paste the following URL:
https://login.microsoftonline.com/sourcetenant.onmicrosoft.com/adminconsent?client_id=[application_id_of_the_app_you_just_created]&redirect_uri=https://office.com
Note: Replace sourcetenant.onmicrosoft.com with your actual source tenant name, and substitute [application_id_of_the_app_you_just_created] with the application ID of the app you created.
- After making the changes, open the edited URL in a browser where you are logged in with your Source Tenant account.
- When the pop-up appears, accept the application invitation.
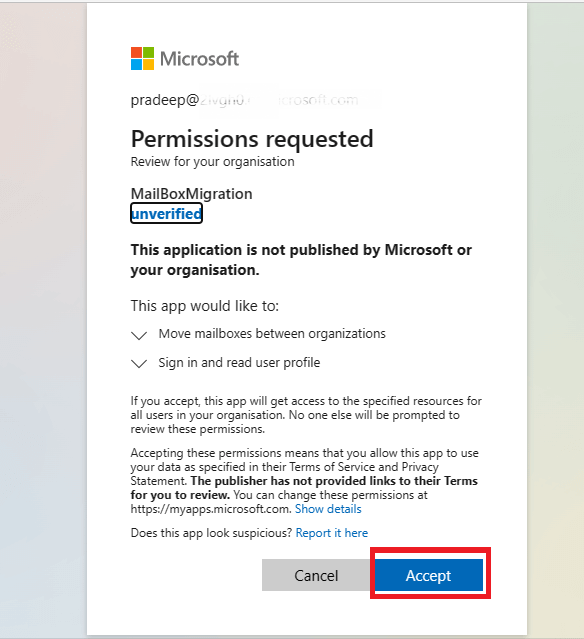
- Connect to Exchange Online PowerShell using the credentials for your Source Tenant account.
- Once connected, either create a new organization relationship or modify the existing one to link with your Target (Destination) Tenant using the appropriate PowerShell script.
$targetTenantId="[tenant id of your trusted partner, where the mailboxes are being moved to]"
$appId="[application id of the mailbox migration app you consented to]"
$scope="[email address of the mail enable security group we created]"
$existingOrgRel = $orgrels | ?{$_.DomainNames -like $targetTenantId}
If ($null -ne $existingOrgRel)
{
Set-OrganizationRelationship $existingOrgRel.Name -Enabled:$true -MailboxMoveEnabled:$true -MailboxMoveCapability RemoteOutbound -OAuthApplicationId $appId -MailboxMovePublishedScopes $scope
}
If ($null -eq $existingOrgRel)
{
New-OrganizationRelationship "[name of your organization relationship]" -Enabled:$true -MailboxMoveEnabled:$true -MailboxMoveCapability RemoteOutbound -DomainNames $targetTenantId -OAuthApplicationId $appId -MailboxMovePublishedScopes $scope
}
Note: Replace the placeholder [tenant id of your trusted partner, where the mailboxes are being moved to] with the Tenant ID of the Target Tenant. Similarly, replace [application id of the mailbox migration app you consented to] with the Application ID of the migration app. For [email address of the mail-enabled security group we created], input the email address of the mail-enabled security group you set up. Finally, substitute [name of your organization relationship] with the name of the organization relationship created in the Target Tenant.

Create an organization relationship. However, after completing these steps, the next task is to create mail users in the Target Tenant for the cross-tenant migration. Let’s walk through how to do this.
Steps to Create Mail Users in the Target Tenant
- To create mail users in the Target Tenant, log in to the Office 365 Admin Center using the Target Tenant account. Once inside, navigate to the Exchange Admin Center by selecting Exchange from the left sidebar.

- In the Exchange Admin Center, click on Recipients, then choose Contacts from the drop-down menu. In the Contacts window, click on the Add a Mail User tab to begin.

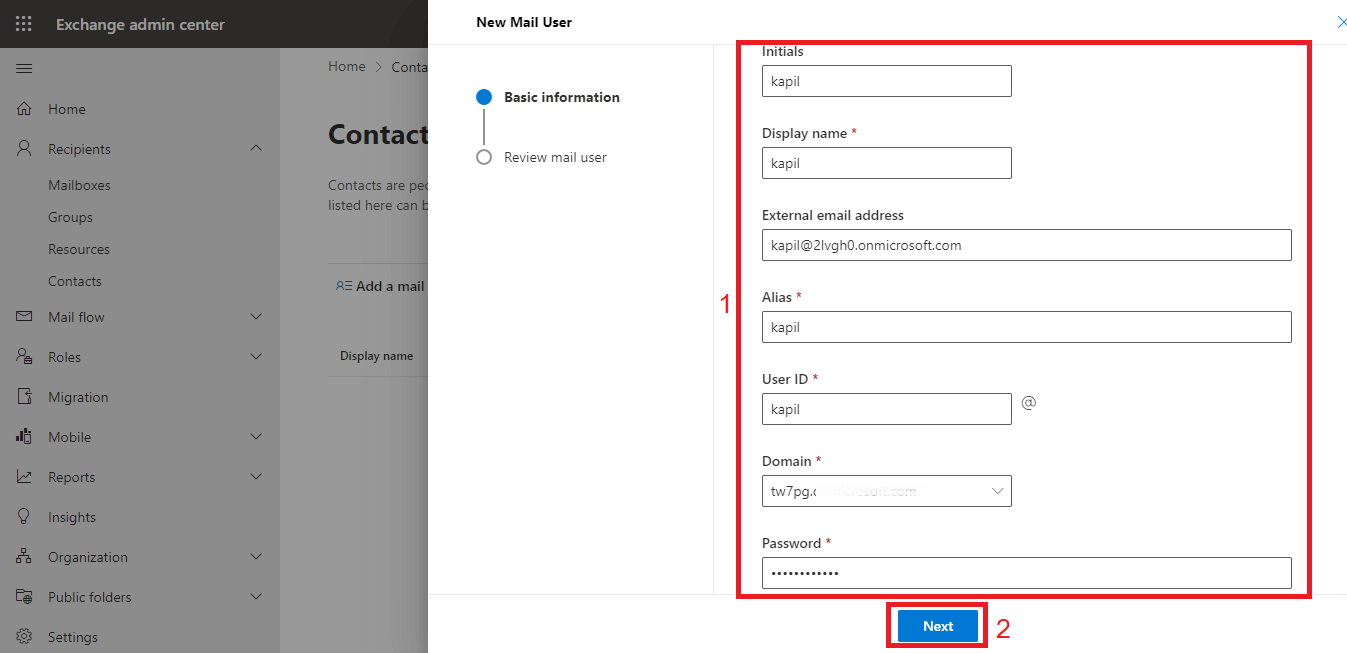
- A new mail user creation window will appear on the right side. Fill in the required details, such as the first name, last name, and other necessary fields. In the External Email Address field, enter the email address of the source user. Once all details are filled out, click the Next button.
- Review the information you’ve provided and click Create to finalize.
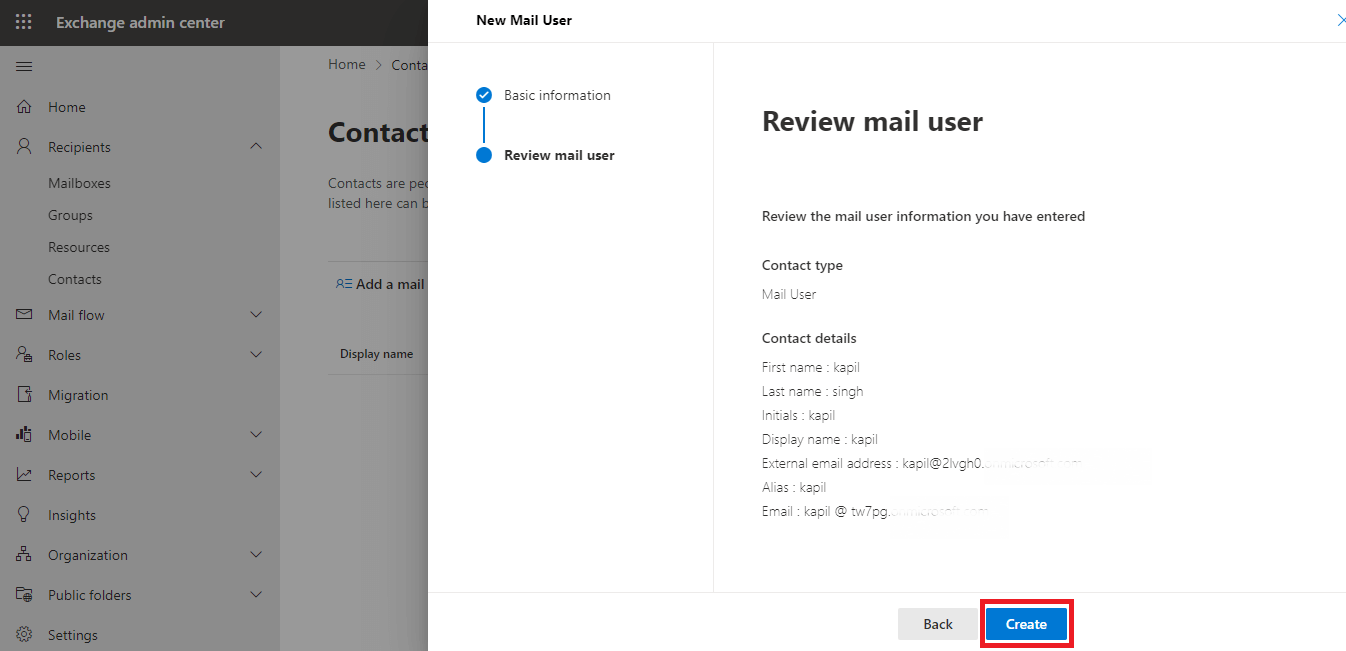
Note: You must create a mail user for each mailbox you intend to migrate to the Target Tenant.
After creating mail users in the Target Tenant, update the ExchangeGuid and ExchangeLegacyDn of the source mailbox in the corresponding mail user in the Target Tenant.
Steps to Find ExchangeGuid and ExchangeLegacyDN of the Source Mailbox
- To retrieve the ExchangeGuid and ExchangeLegacyDN of a source mailbox, run the following command in PowerShell while connected to your Source Tenant account:
Get-Mailbox [Source Tenant Mailbox Address] | fl Name,ExchangeGuid,LegacyExchangeDN
Note: Replace [Source Tenant Mailbox Address] with the email address of the source mailbox user and run the command for each user to retrieve their ExchangeGuid and ExchangeLegacyDN.
- When you execute the command, the details will be displayed. Copy and save the ExchangeGuid and ExchangeLegacyDN for each user one by one for later use.

Add ExchangeGuid and ExchangeLegacyDN in the Target Tenant
To complete the setup, you need to input the ExchangeGuid and ExchangeLegacyDN of the source user mailbox into the corresponding users in the Target Tenant.
- To add the ExchangeGuid, use the following command in the Target Tenant PowerShell:
Command:
Set-MailUser -Identity [email address of the Target user] -ExchangeGuid [ExchangeGuid of the source user]

- To add the ExchangeLegacyDN, use this command in the Target Tenant PowerShell:
Command:
Set-MailUser -Identity [email address of the Target user] –EmailAddresses @{add="x500:[LegacyExchangeDN of the Source user]"}

Note: Perform these steps for each user in the Target Tenant PowerShell.
Test the Migration Server Availability
- To ensure the setup is correct, type the following command in the Target Tenant PowerShell:
Command:
Test-MigrationServerAvailability -EndPoint "[the name of your migration endpoint]" -TestMailbox "[Primary SMTP of Mail User object in target tenant]"

If there are any issues, the status will show as failed, indicating something is missing or incorrect.
Assign Licenses to Mail Users in the Target Tenant
- Log in to the Admin Center of the Target Tenant and navigate to Users > Active Users.

- Select all the mail users that were created earlier. Click on the three dots in the toolbar and choose Manage Product Licenses from the drop-down menu.

- A window will appear on the right side. Choose the Replace option. Under the licenses section, select the desired license for the users and click Save Changes.

The system will take some time to assign the licenses to all selected users.
Once the licenses are assigned, you can proceed to create the migration batch for cross-tenant migration.
Procedure to Create a Migration Batch in the Target Tenant
- Log in to the Admin Center of the Target Tenant. After entering, click on Show All in the left sidebar, scroll down, and select Exchange to open the Exchange Admin Center.
- In the left sidebar, select Migration. The Migration Batches window will appear. Click on Add Migration Batch to create a new batch.

- Enter a name for the migration batch. Under Mailbox Migration Path, select Migration to Exchange Online, then click Next.

- Choose Cross-Tenant Migration as the migration type, and click Next to proceed.

- The system will display the prerequisites for cross-tenant migration. Since these were completed earlier, click Next to continue.

- Select the Migration Endpoint that was previously created using PowerShell.

- Create an Excel file with the required user details (e.g., email addresses), save it as a CSV file, and import it.
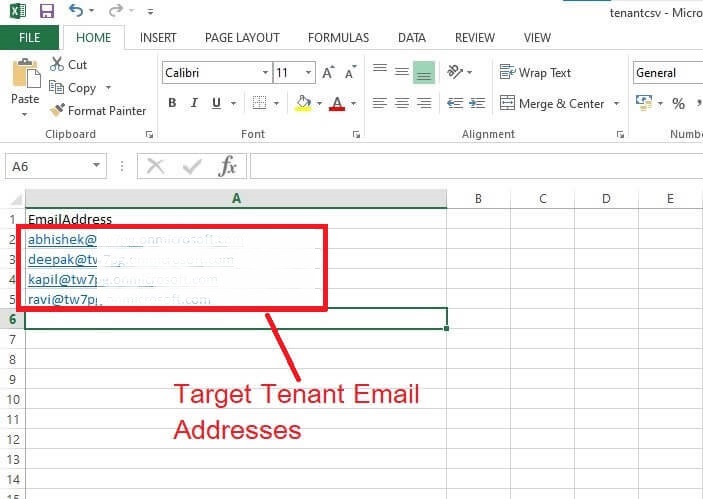
- Click Next after importing the file.

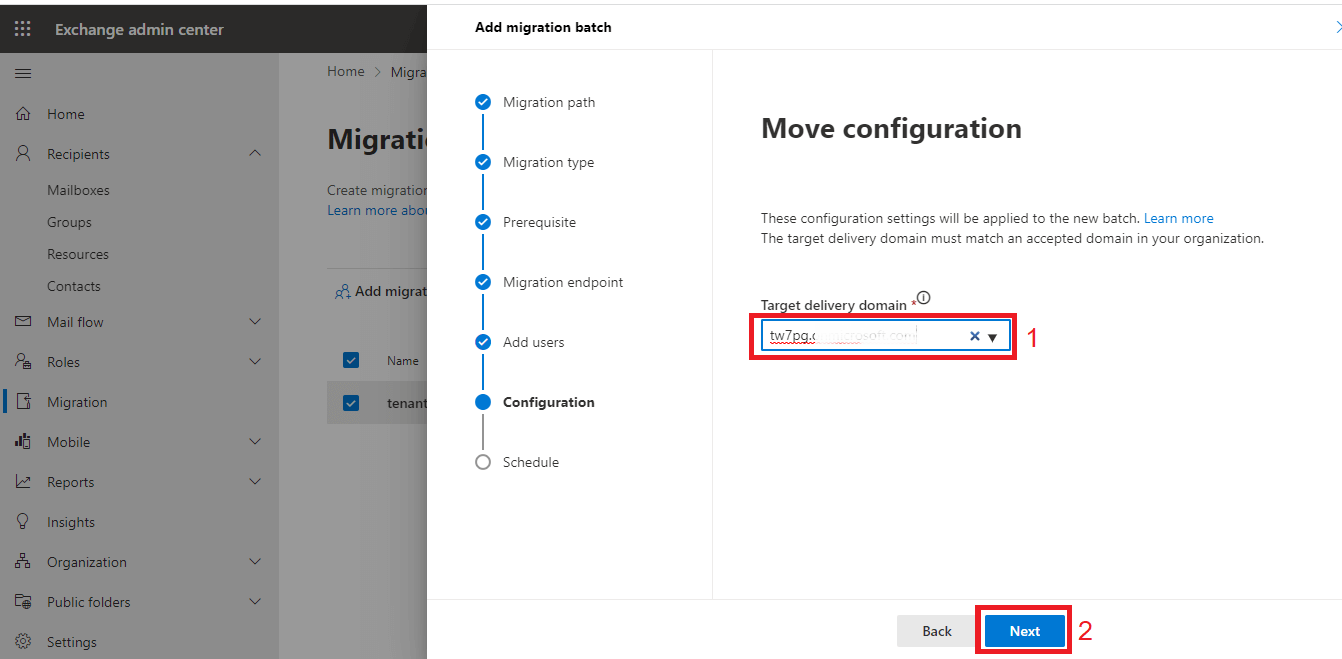
- Enter the domain of the Target Tenant as the Target Delivery Domain, and click Next.
- In the Schedule Migration Batch window, choose to Automatically Start the Batch under Start the Migration Batch. Select Automatically Complete the Migration Batch under End the Migration Batch.Set the timezone and click Save.

- Once the batch is created, a confirmation window will show the status as Batch Creation Successful. Click Done to finish.

- In the Migration Batches window, you’ll see the status of your migration batch as Syncing.

- The time required depends on the number of users and the size of their data.When the process is complete, the status will update to Completed.

All user mailboxes have now been successfully migrated to the Target Tenant. You will also receive an email notification once the cross-tenant migration process is complete.
Conclusion
Office 365 tenant to tenant migration is an important but complicated process that companies often need to do during things like mergers, acquisitions, or organizational changes. To move emails, data, and resources from one Office 365 account to another with as minimum disturbance as possible, it’s essential to follow a clear, step-by-step approach.
The key to a successful transfer is careful preparation, efficient setup, and the use of appropriate tools like PowerShell and the Microsoft 365 Admin middle. The strategy includes a variety of specialized activities, such as establishing mail-enabled security agencies, developing migration endpoints, and maintaining licensing. Each of these activities is crucial to maintaining data security and business continuity. Moreover, you can manage the new tenant more effectively, save money, and grow your business as needed if you plan ahead and have the right tools for a seamless transfer.
FAQ
Q1. What is Office 365 Tenant Migration?
Ans: Office 365 Tenant to Tenant Migration refers to the process of transferring data, users, and mailboxes from one Office 365 tenant to another. This type of migration is often necessary during mergers, acquisitions, or when an organization switches its Office 365 subscription. It involves careful planning to ensure minimal disruption to services and to maintain data integrity.
Q2. Why Do I Need to Migrate From One Office 365 Tenant to Another?
Ans: There are several reasons for migrating from one Office 365 tenant to another, including business mergers, acquisitions, reorganizations, or changing domain names. Additionally, it may be required for consolidating multiple Office 365 tenants into one or for transferring data between different regions or subscription plans.
Q3. What Are the Challenges of O365 Tenant to Tenant Migration?
Ans: Challenges during Office 365 Tenant to Tenant Migration include data loss, extended downtime, user disruption, and configuration issues. Although, ensuring that all data, settings, permissions, and integrations transfer smoothly requires careful planning and expert execution. Some specific challenges are migrating shared mailboxes, public folders, and custom configurations.
Q4. How Long Does O365 Tenant to Tenant Migration Take?
Ans: The duration of a Tenant to Tenant Migration depends on the volume of data being transferred, the complexity of the migration, and the tools being used. Small-scale migrations may take a few days, while large or more complex migrations could take several weeks. It’s essential to plan and test the migration carefully to avoid unnecessary delays.
Q5. What Are the Best Practices for Office 365 Tenant to Tenant Migration?
Ans: Some best practices for a smooth Office 365 Tenant Migration include:
- Plan thoroughly with a detailed migration strategy.
- Use third-party migration tools for ease and accuracy.
- Communicate with all stakeholders to minimize downtime and disruptions.
