Email security is very important and even more crucial for organizations that are heavily dependent on email conversations. Most of the time, large organizations face many challenges or attacks like phishing attacks, spam emails, and e-mail spoofing, these issues are mainly faced by organizations. To prevent these issues, the most effective way is to introduce DNS SPF record i.e. Sender Policy Framework.
In this guide, we will explain what an SPF record is, how it works, and how we can configure it.
Table of Content
What is DNS SPF Records?
SPF records are a security feature used to prevent email spoofing and phishing attacks. They verify mail servers and also which servers are allowed to send emails on behalf of which domain.
SPF records are added to your domain’s DNS settings as TXT records. DNS SPF records were introduced because the email protocol used to send messages, SMTP i.e.; Simple Mail Transfer Protocol, the email protocol used to send messages, does not verify the SMTP “from” address.
Without SPF or other authentication processes, attackers can imitate or spoof the legitimate sender without any problem and trick recipients into doing things they shouldn’t, such as sharing sensitive information.
How Does SPF Work?
SPF stands for Sender Policy Framework and it is used when an email is received by you at the same time the mail server checks the SPF record of the sender’s domain. It verifies if the email is coming from a recognized and authorized server.
If coming from an authorized server, then the email is genuine. If it is not, then the email can be marked as spam or blocked to prevent any fraud. This method helps in preventing spamming emails or spoofing and saves people from phishing scams.
How to Create the DNS SPF Record?
Step 1: Identify Authorized Mail Servers
Before we create an SPF record, we need to figure out which mail servers are authorized to send emails as representatives of your domain.Like:
- Your own email server (e.g., an on-premise mail server).
- Third-party email services (e.g., Google Workspace, Microsoft 365, Mailchimp, or other email marketing services).
Step 2: Create an SPF Record (TXT Record)
A DNS SPF record is a TXT record that verifies which mail servers or IP addresses are allowed to send emails as a representative of your domain. The SPF record in DNS follows the below format:
“ v=SPF1 <mechanisms> -all “
1) v=SPF1 – Specifies the SPF version.
2) <mechanisms> – Defines authorized email sources (IP addresses or domains).
3) -all – Denies all other mail servers not listed.
Example:
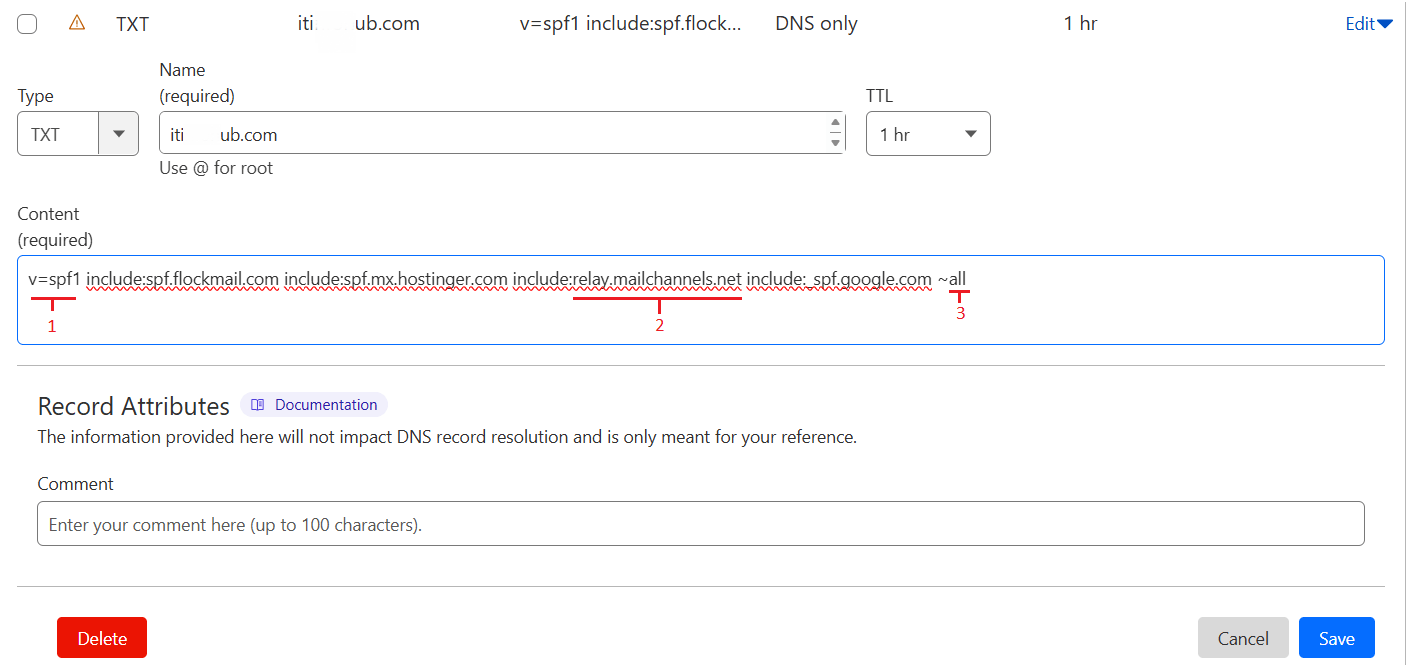
1) include:spf.flockmail.com – Authorizes flockmail’s mail servers.
2) include:relay.mailchannels.net – Authorizes Mailchimp’s mail servers.
3) -all – Blocks all other unauthorized mail servers
Step 3: Add the DNS SPF Record to the Domain’s DNS Settings
Once, the SPF record has been created, you have to need to add your domains to your DNS settings
How to Add an SPF Record in DNS
- Log in to your registered domain control panel (e.g., GoDaddy, Namecheap, Cloudflare, or wherever your DNS is hosted).
- Go to the DNS settings or DNS management section.
- Search for the option to add a new TXT record.
- Enter the following details:
- Type: TXT
- Host/Name: @ (or your domain name)
- Value: Your SPF record (e.g., v=SPF1 include:spf.mx.hostinger.com include:spf.google.com ~all)
- TTL (Time-To-Live): Leave it as default (e.g., 3600 seconds or 1 hour).
- Save the changes and wait for DNS propagation i.e. it may take a few minutes to 24 hours to update across all servers.
Step 4: Test and Verify SPF Configuration
Once the process of adding a DNS SPF record is complete, it is important to verify and check that it is correctly configured or not.
Send a Test Email:
- Send an email to a Gmail account and check the email headers for SPF verification.
- If SPF passes, you will see a line like this in the email headers
Received-SPF: Pass (google.com: domain of [email protected] designates xx.xx.xx.xx as permitted sender)
Best Practises of DNS SPF Record Configuration
- Add only those hosts that are necessary to your SPF record.
- Regularly review and update your SPF records as per the changes in your email frames from time to time.
- Avoid using multiple SPF records, instead use a single SPF record
- Remember, always end your SPF record with “-all” or “~all”, if you don’t use – and ~, as a result, it will show that you have failed.
- SPF records are limited to 10 DNS lookups.
Conclusion
In this article, we learned how to configure SPF records and how to ensure that only authorized servers can send emails on behalf of your domain. By implementing SPF correctly, organizations can secure their email communications and reduce the risk of cyber threats. If you find this article helpful then share it with others. For more information contact the support team.


