This article explains how to migrate from Google Workspace to Office 365, step by step. It also talks about the different plans and prices for both Google Workspace and Microsoft 365. Both are popular cloud email services with different subscription options. Users can choose the platform they like—some prefer Gsuite, while others use Microsoft 365. The competition between Gsuite and Microsoft 365 is strong because they offer similar features. This article shows you how to perform Google Workspace to Office 365 Migration manually.
Table of Content
- 1 Steps to Carry Out the Google Workspace To Office 365 Migration
- 2 Adding a Domain to Your Microsoft 365 Account
- 2.1 Steps to Add Active Users for Migrating from Google Workspace to Office 365
- 2.2 Steps to Migrate from Google Workspace to Office 365
- 2.3 Automating the Configuration of Google Workspace for Migration
- 2.4 Add Domain-Wide Delegation
- 2.5 Manual Configuration of Prerequisites
- 2.6 Provide API Permissions
- 2.7 Conclusion
Steps to Carry Out the Google Workspace To Office 365 Migration
In this guide, we’ll show you how to migrate from google workspace to microsoft 365. Microsoft provides two ways to handle this migration:
- Automatic Method: This method automatically does some tasks to make the process easier for you.
- Manual Method: This method requires you to do some tasks on your own.
We will explain both methods here. You might wonder why you would need the manual method if the automatic one saves time. The reason is that sometimes the automatic process might have errors, and in those cases, you’ll need to do things manually. But if the automatic method works fine, you won’t need to worry about the manual steps. The first thing we need to do is add your Go domain to Microsoft 365. Let’s see how to do that and start the google workspace to microsoft 365 migration process.
Adding a Domain to Your Microsoft 365 Account
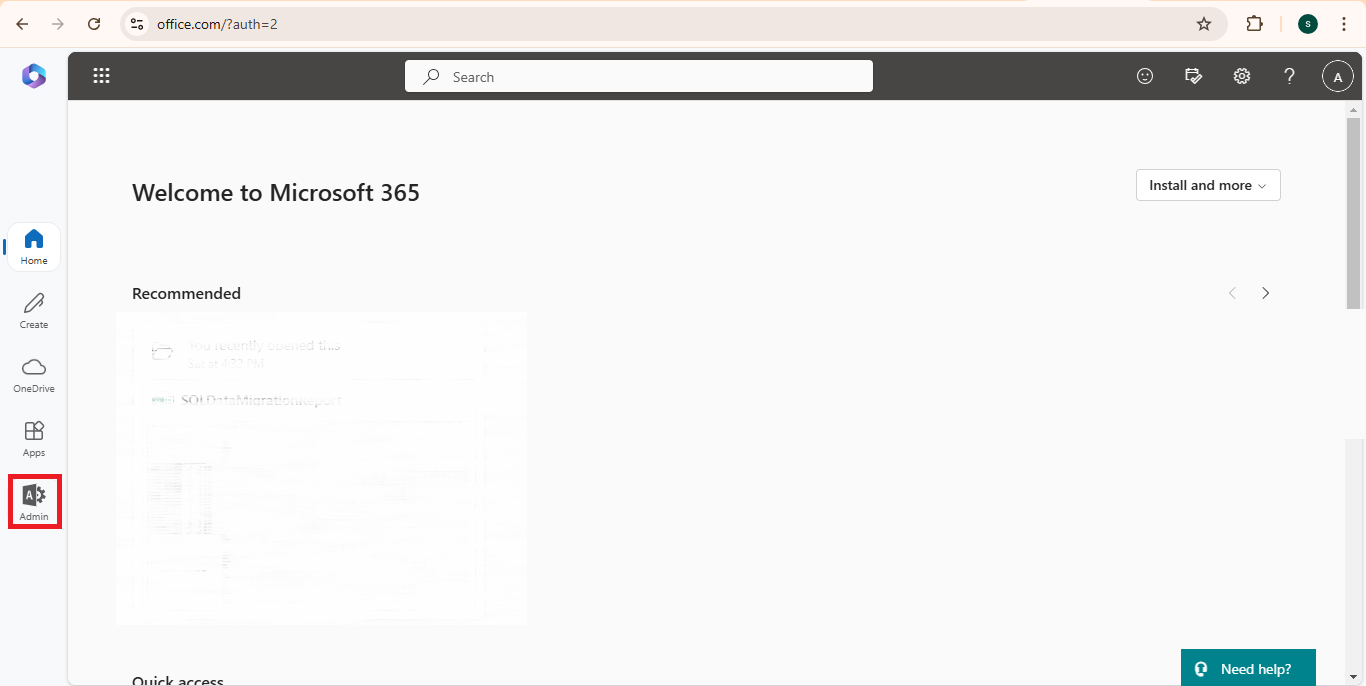
- Log in to office.com using your admin login credentials.
- Once logged in, select Admin from the apps panel
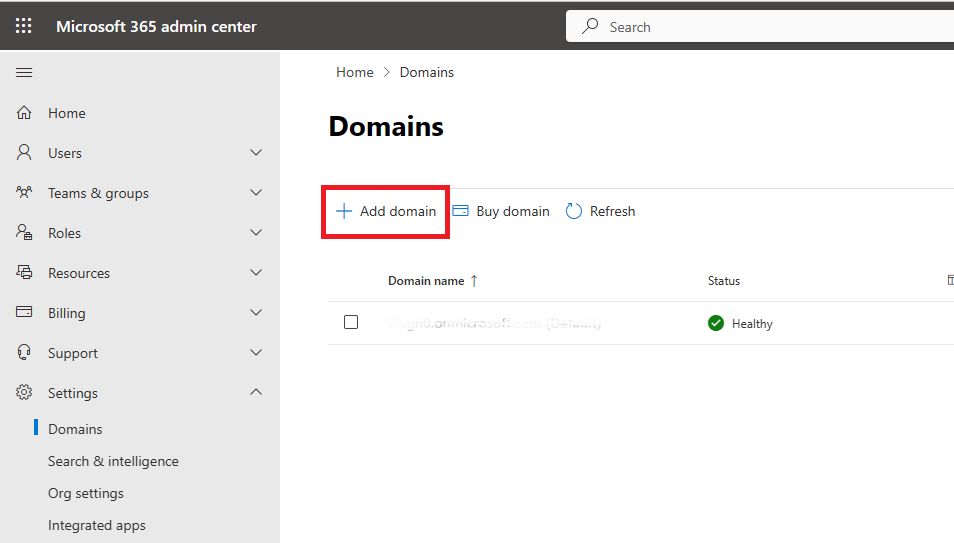
- After entering the Admin center, click on Settings in the left sidebar, then select Domains.

- In the Domains section, click on the Add domain button to add your Google Workspace domain.
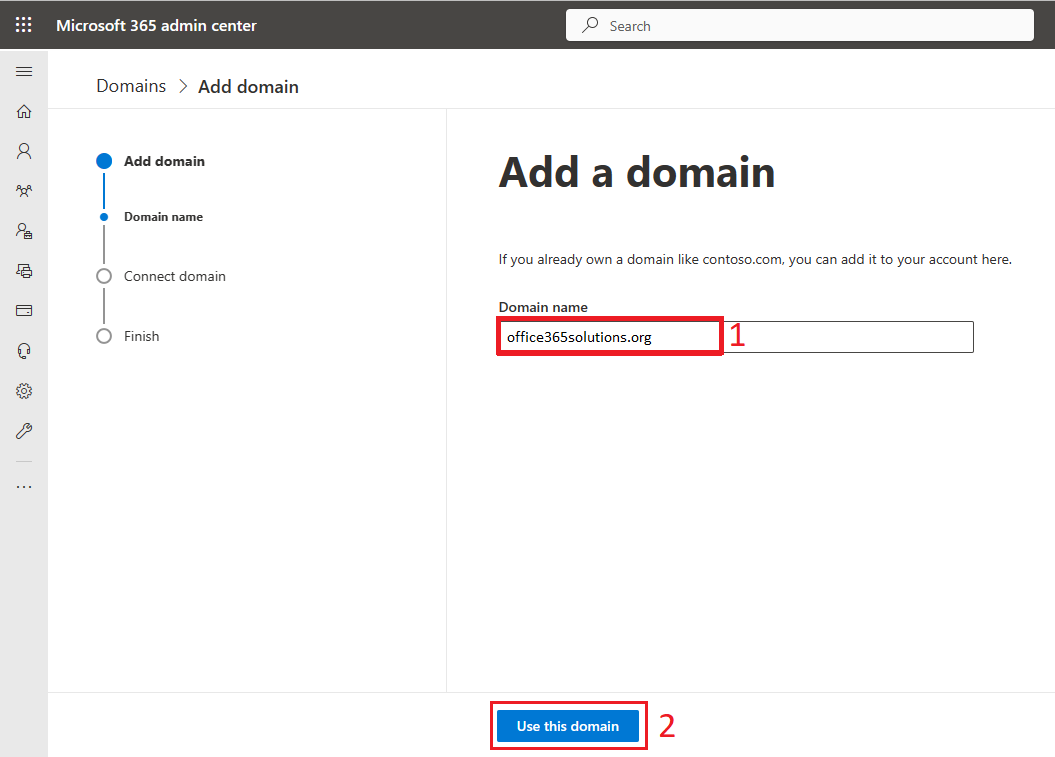
- The Domain wizard will open. In the Domain name field, enter your domain name and click on Use this Domain.
- You will need to verify your domain. There are four options for verifying domain ownership. Choose the method that works best for you, then click Verify.

- When asked, “How do you want to connect your domain?”, select Skip and do this later, then click Continue.

Note: We are skipping the DNS record setup for now, but it will be done after the Gsuite to Office 365 migration is completed.
- You will see a message that the Domain setup is complete. Click the Done button.

Once you click Done, your domain will be successfully added and set as the default.
Steps to Add Active Users for Migrating from Google Workspace to Office 365
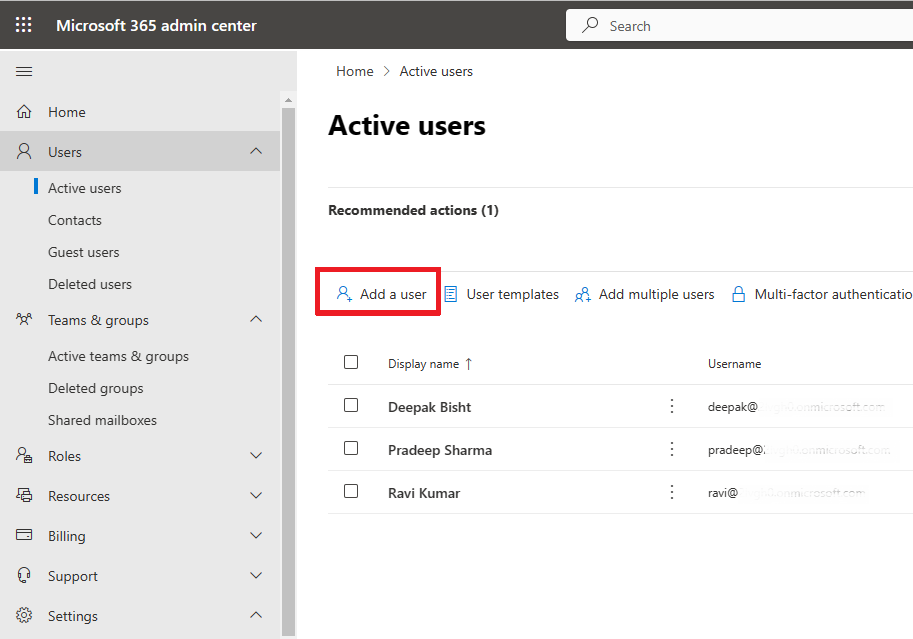
- In the Microsoft 365 Admin Center, click on Users, then select Active users to add new users for the google workspace to office 365 migration process.
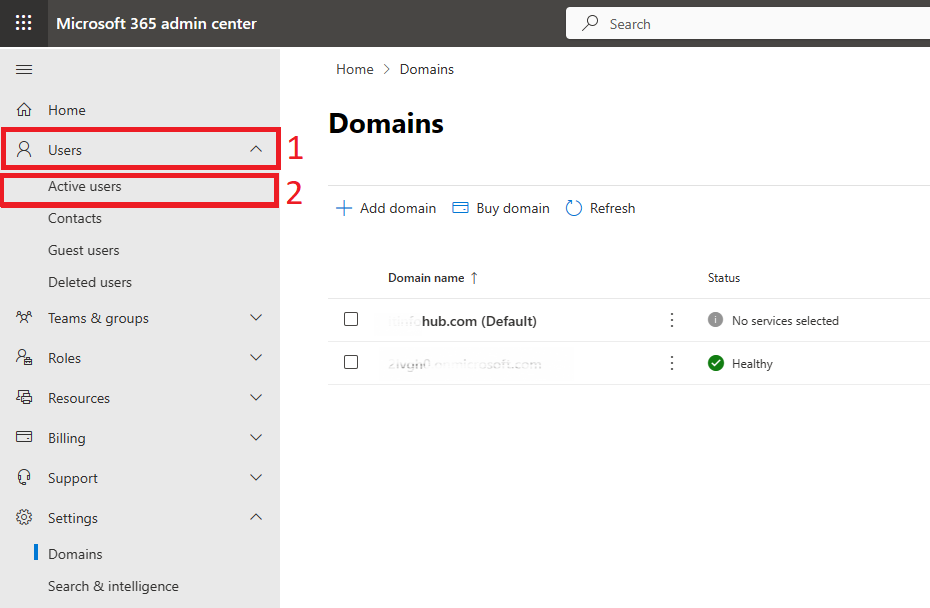
- Once in the Active Users section, click on the Add a user button to add a new user.
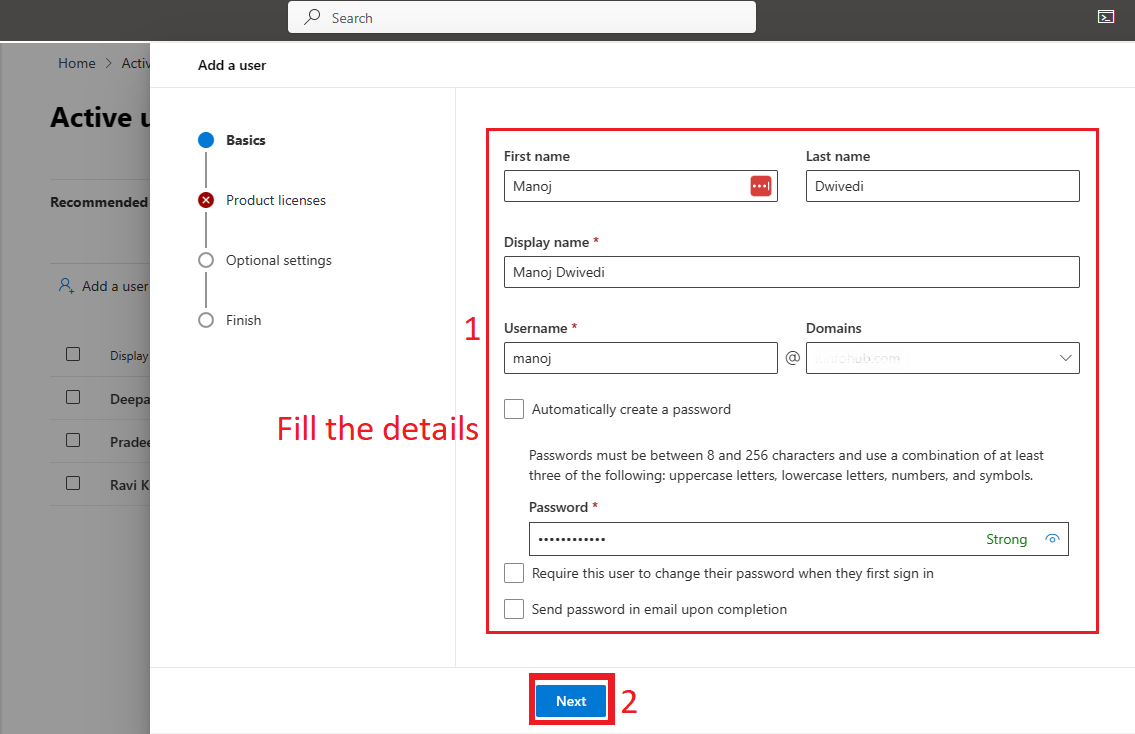
- Fill in basic details such as First Name, Last Name, Display Name, Username, select your domain, uncheck all options, set a password, and click Next.
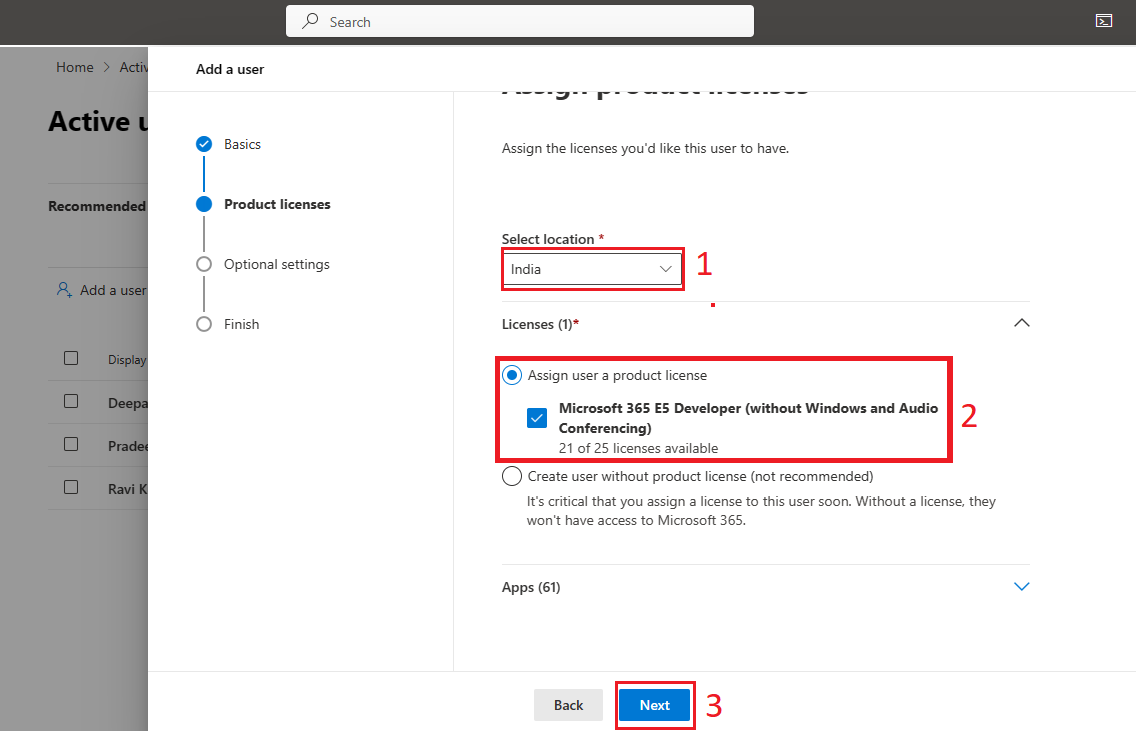
- In the next window, select your location and choose Assign user a product license, then select the appropriate license and click Next.
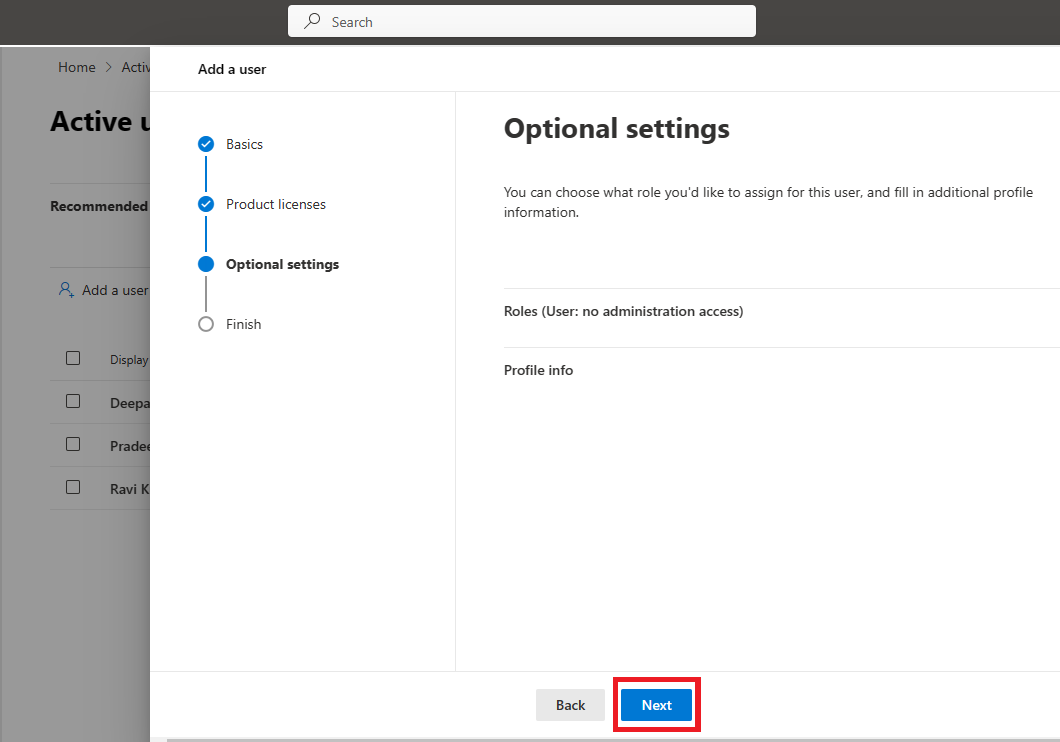
- The Optional settings window will appear. If you want to provide admin access to the user, select it under Roles; otherwise, click Next.
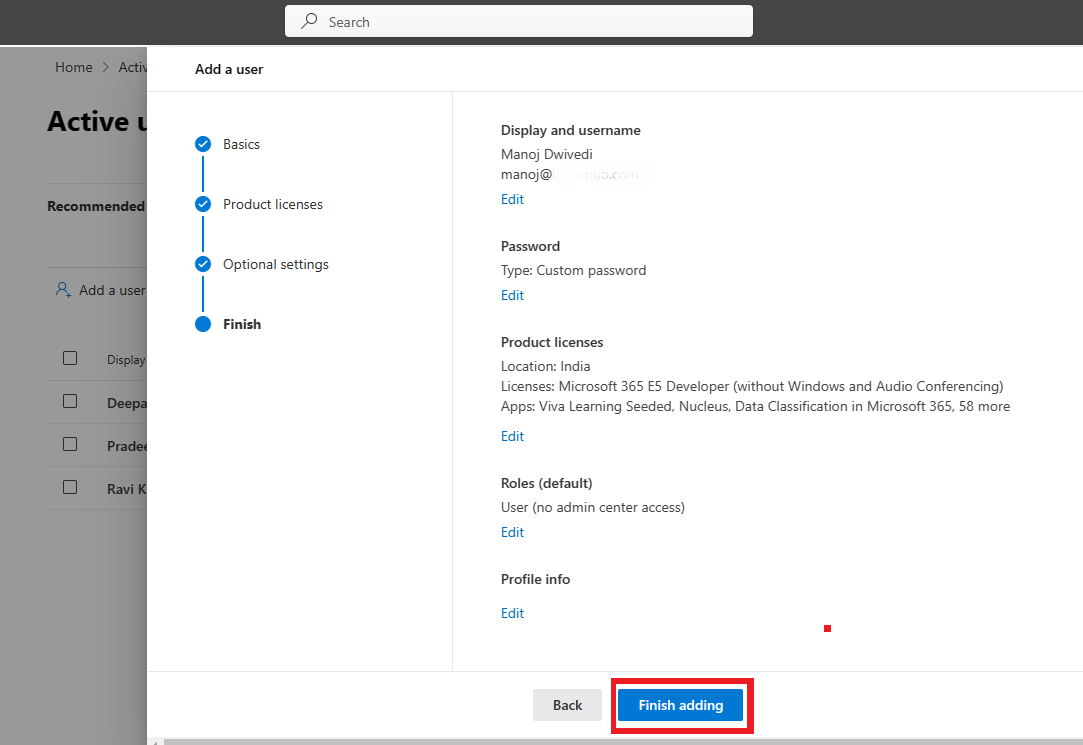
- The Review and Finish window will appear. Review the details and click Finish adding.
- After a few seconds, you will see a confirmation that the user has been added to Active Users. Click the Close button.
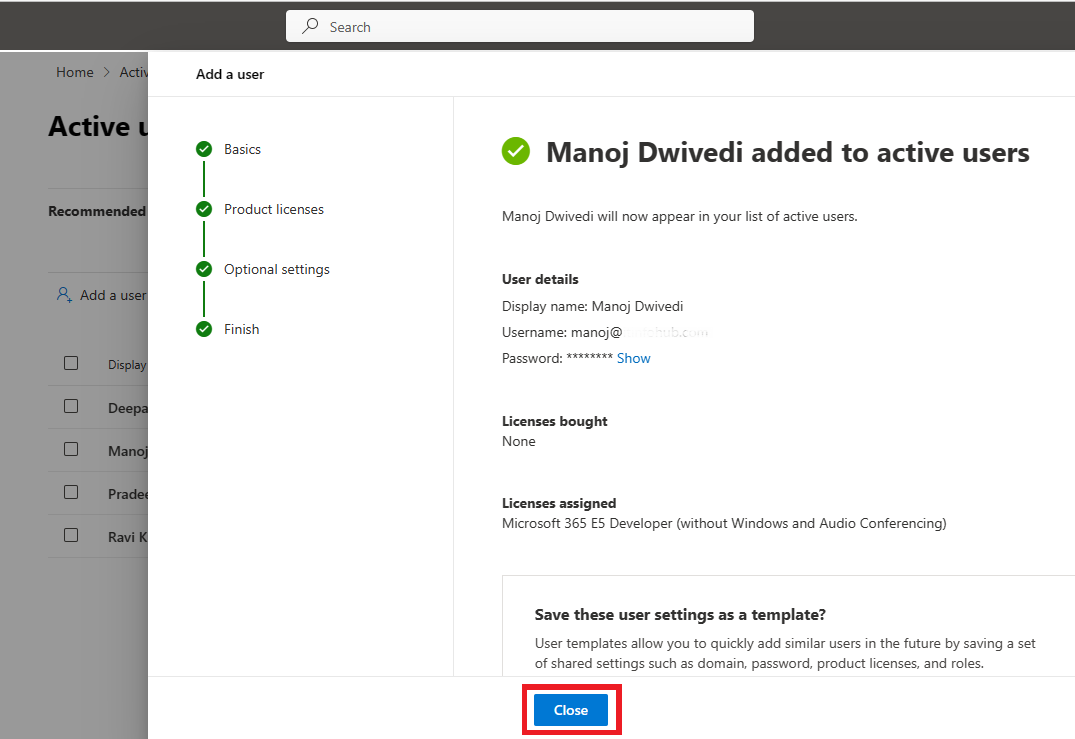
Note: Add all active users you want to migrate and assign them licenses. Once finished, make sure to set your default domain to the previous one to complete the Office 365 migration. To do this, go to Settings, select Domains, and set your default domain from the Admin Center.
Steps to Migrate from Google Workspace to Office 365
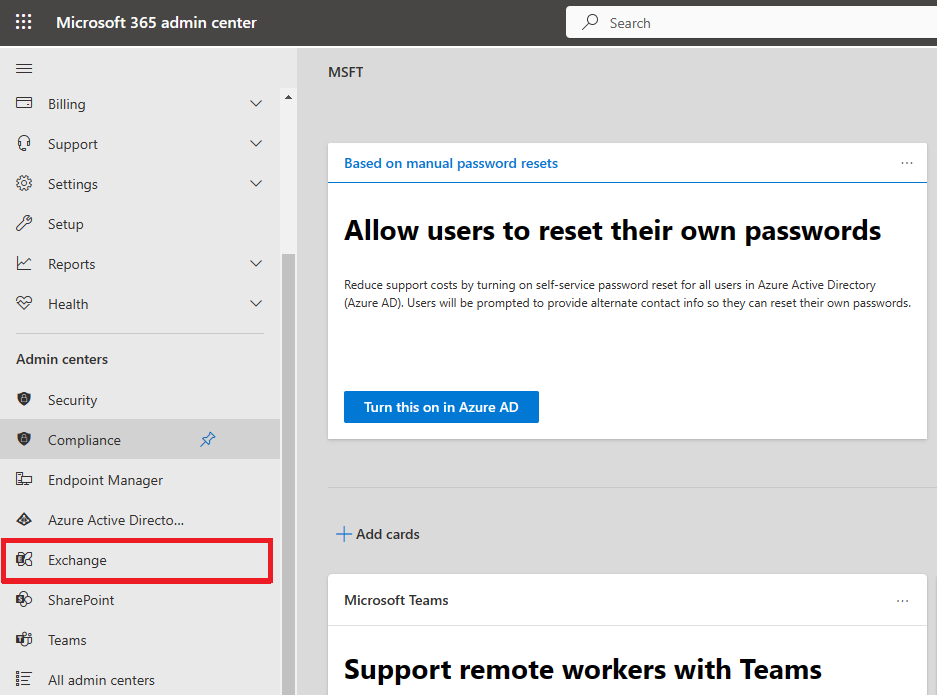
- Open the Admin Center, click on “Show all,” and select Exchange from the left sidebar.
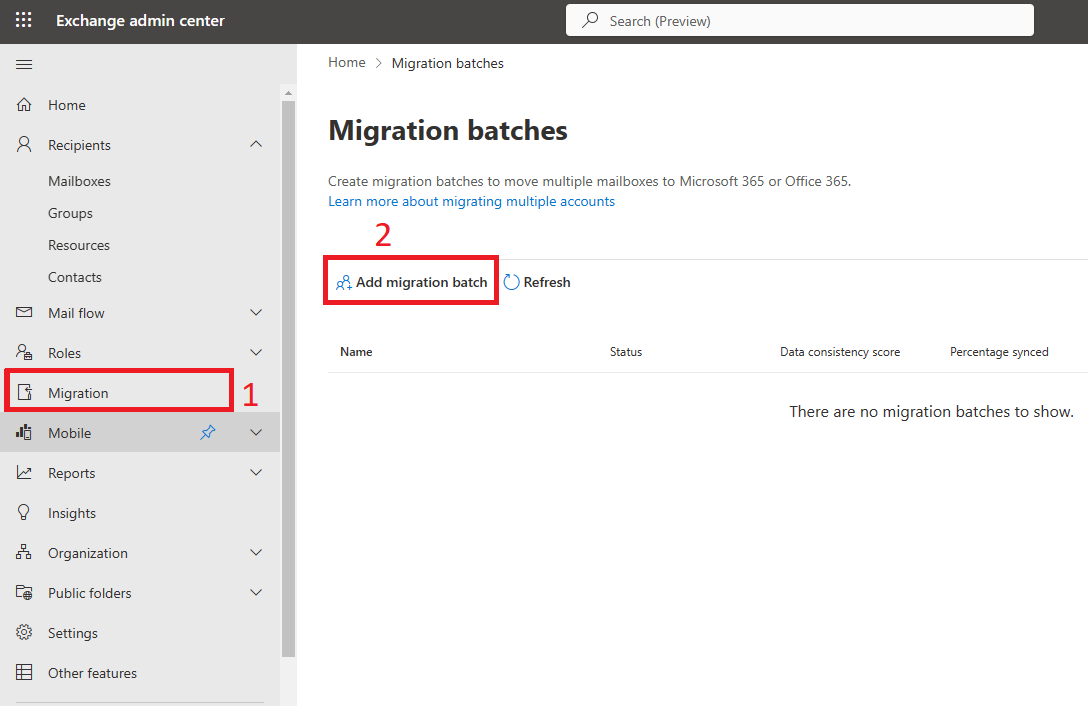
- In the Exchange Admin Center, navigate to Migration in the left sidebar and click on Add migration batch.
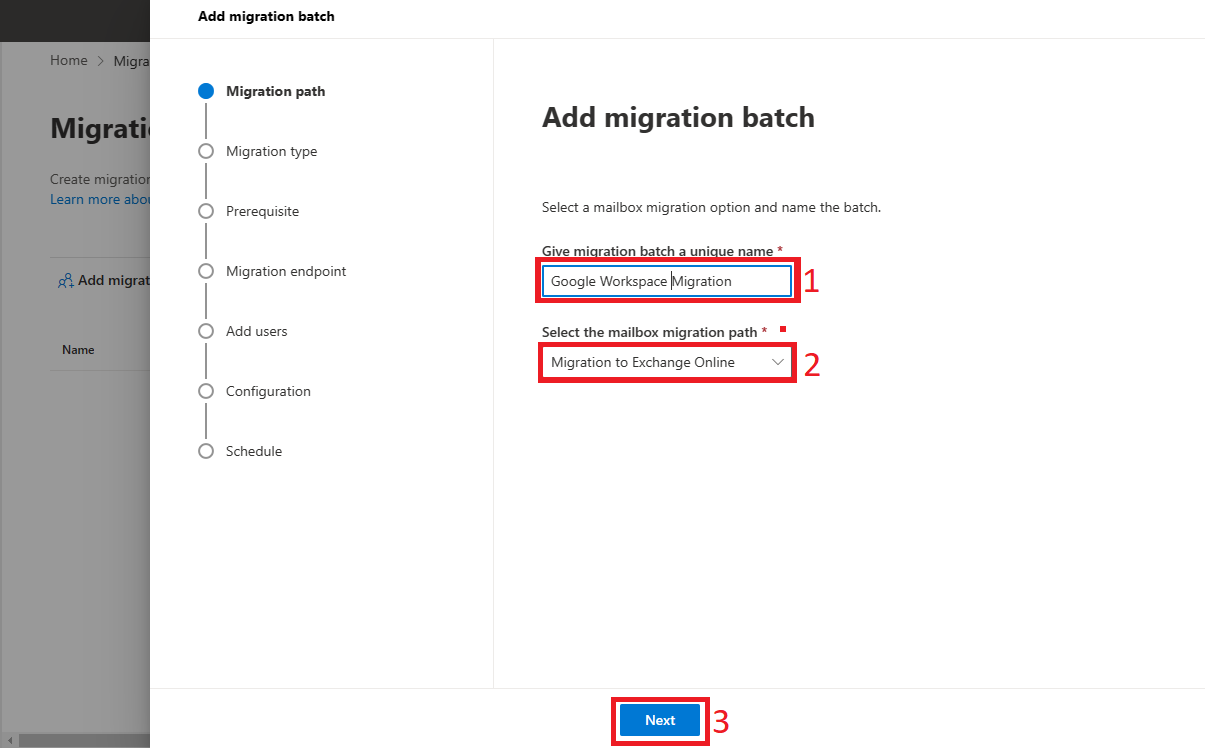
- Enter a name for the migration batch. Under “Select the mailbox migration path,” choose Migration to Exchange Online and click Next.
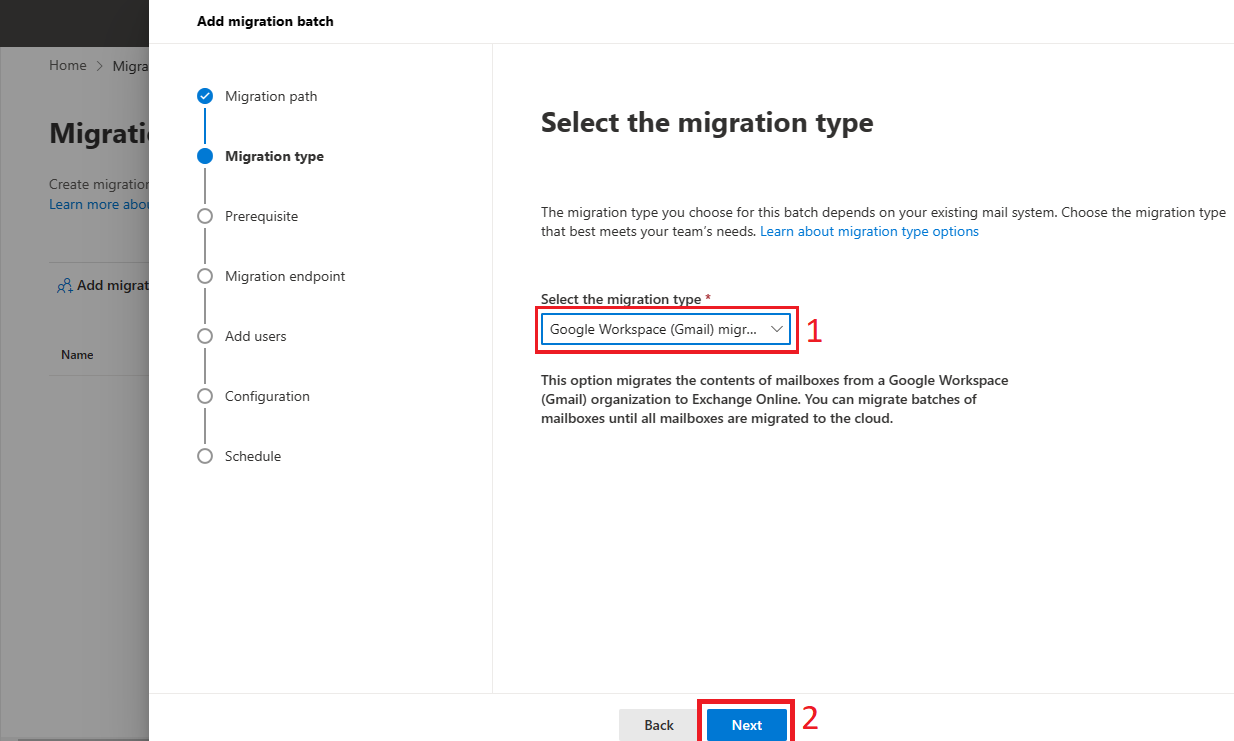
- On the next screen, select the migration type. Choose Google Workspace (Gmail) Migration and proceed by clicking Next.
- The Prerequisites for Gsuite Migration window will appear. Here, you can choose between two methods:
- Automatically configure your Google Workspace for migration.
- Manually configure your Google Workspace for migration.
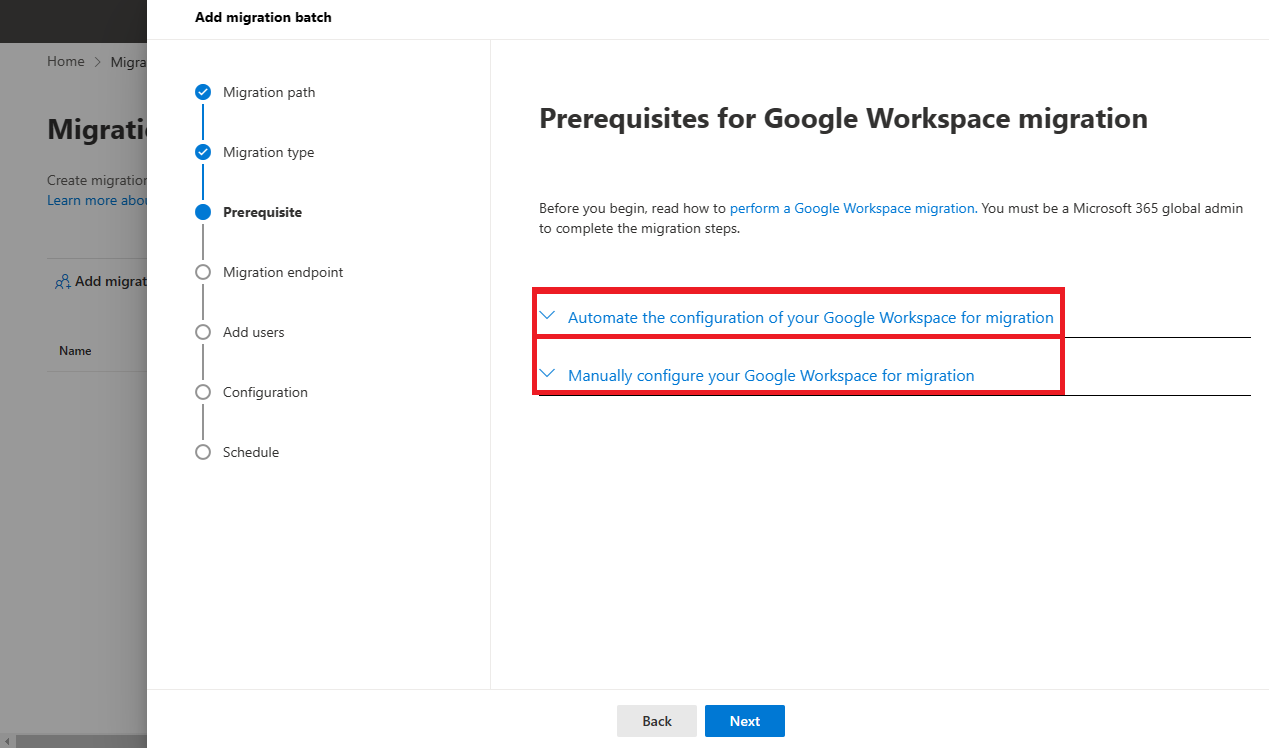
In the following steps, I’ll guide you on how to perform the migration using both the automatic and manual methods.
Automating the Configuration of Google Workspace for Migration
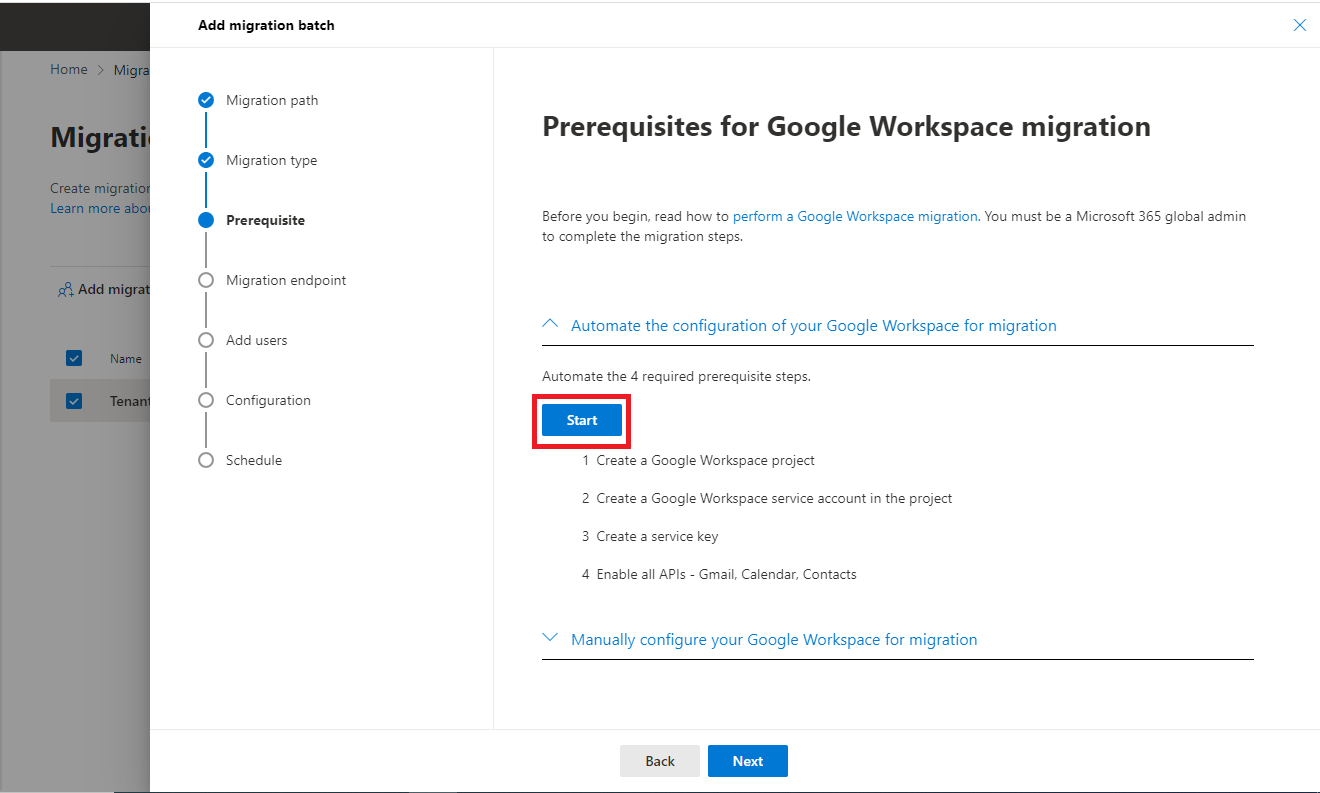
Note: You must log in to Google Workspace using Super Admin credentials.
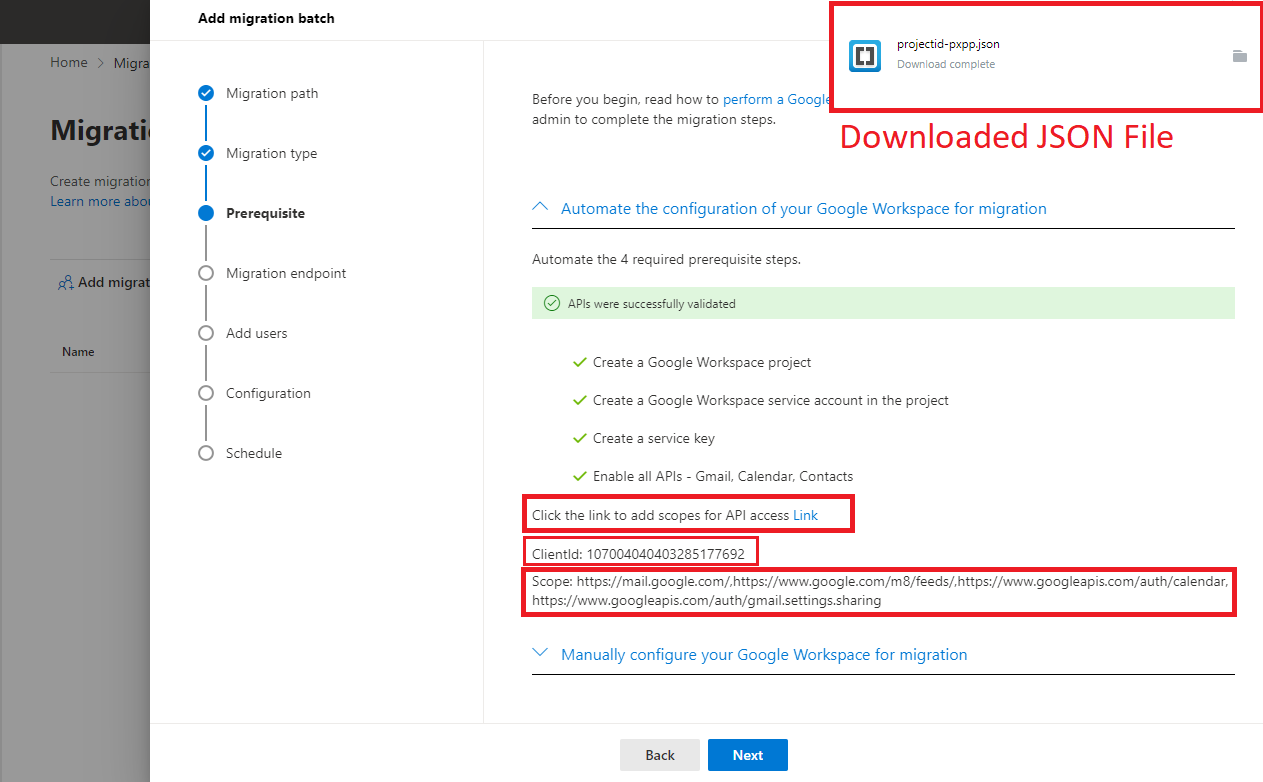
- When you click the Start button, the configuration process will be automated. A Client ID and scope will be generated upon completion. Additionally, a link will be provided to add the scope, and a Private Key JSON file will be downloaded automatically.
Add Domain-Wide Delegation
- Click the provided link (as shown in the image) to add the scope to your Google Workspace account.
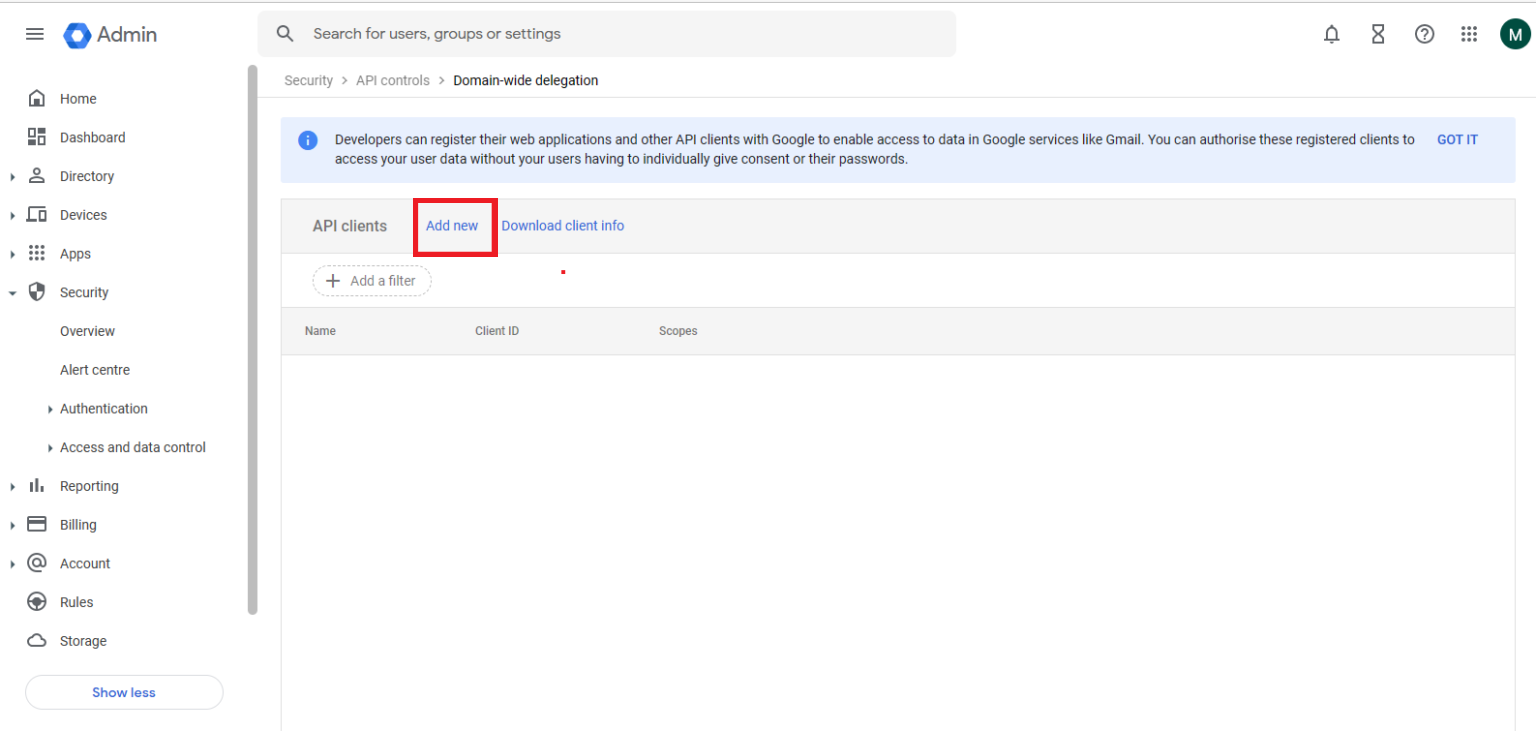
- This will open a new window displaying the Google Admin panel. In the panel, click Add New to enter the scopes and the automatically generated Client ID.
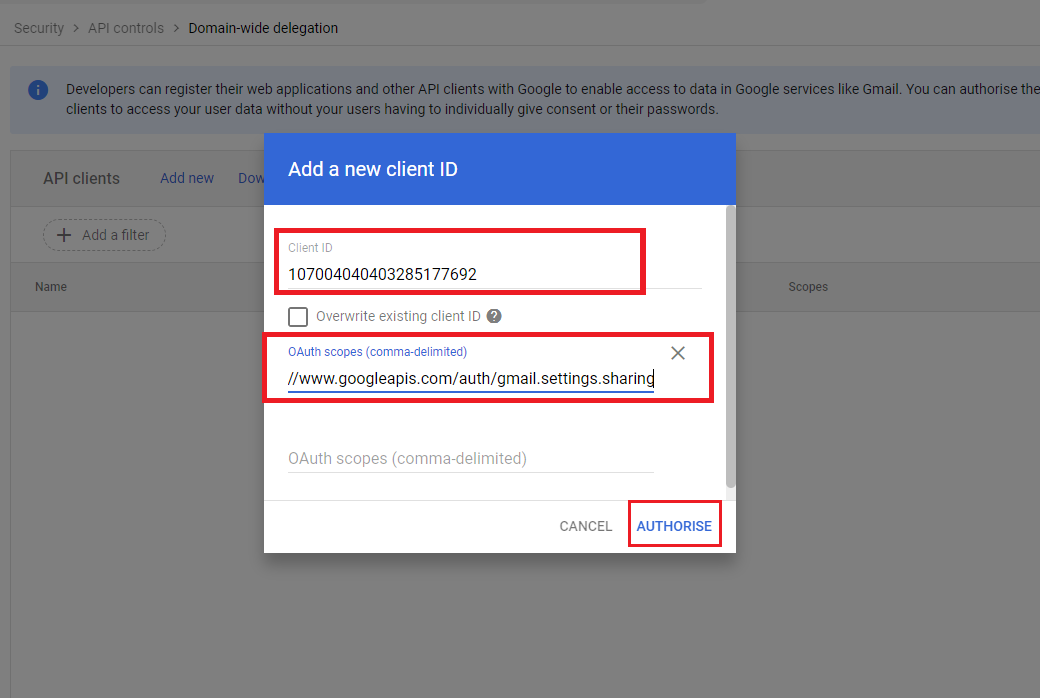
- Enter the Client ID and the required scopes in the designated fields, then click the Authorize button.
These steps complete the automation of prerequisites for migrating from G-Suite to Office 365. Next, let’s explore how to perform these tasks manually.
Manual Configuration of Prerequisites
Let’s now explore how to manually configure the prerequisites for migrating from Google Workspace to Office 365.
Create a Project
- Open console.cloud.google.com, then click on your existing project and select Create New Project.
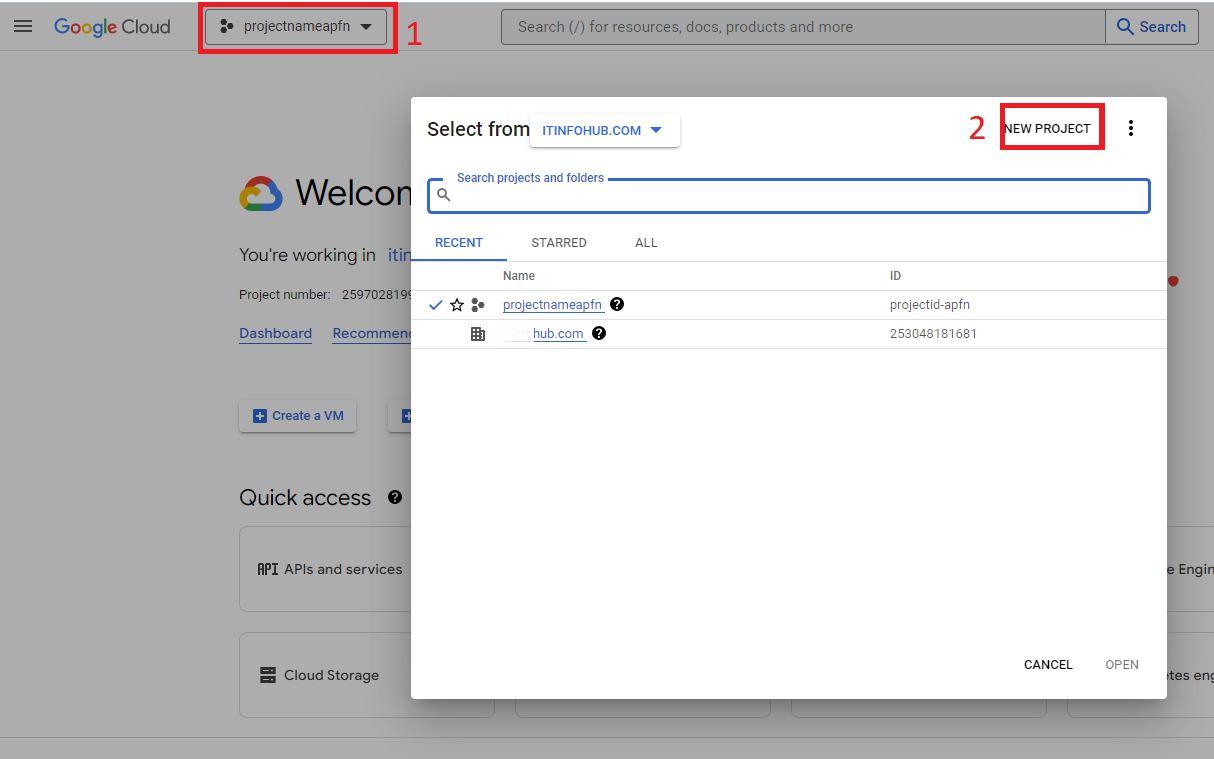
- Enter a Project Name, select your organization, and click the Create button.
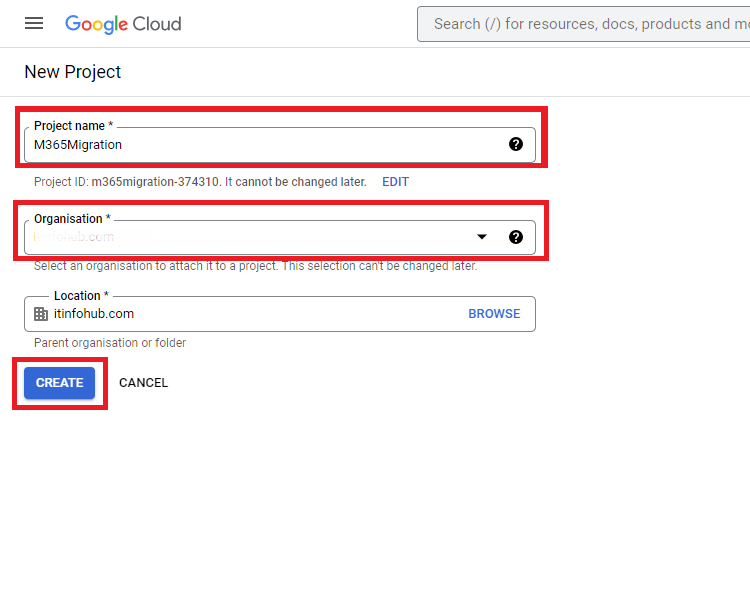
- Once the project is created, you will receive a notification. Click on Select Project in the notification bar to proceed.

Create a Service Account
- To create a service account, go to Google Cloud IAM Admin. Click on Service Accounts and then select Create Service Account.
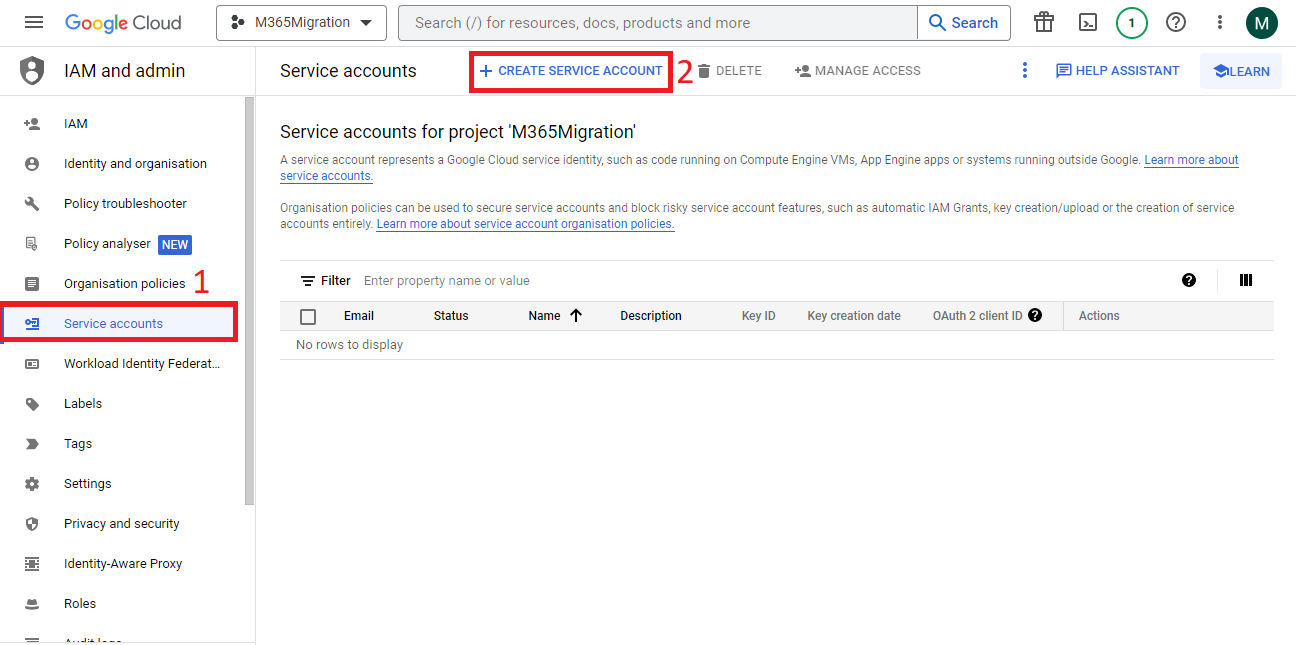
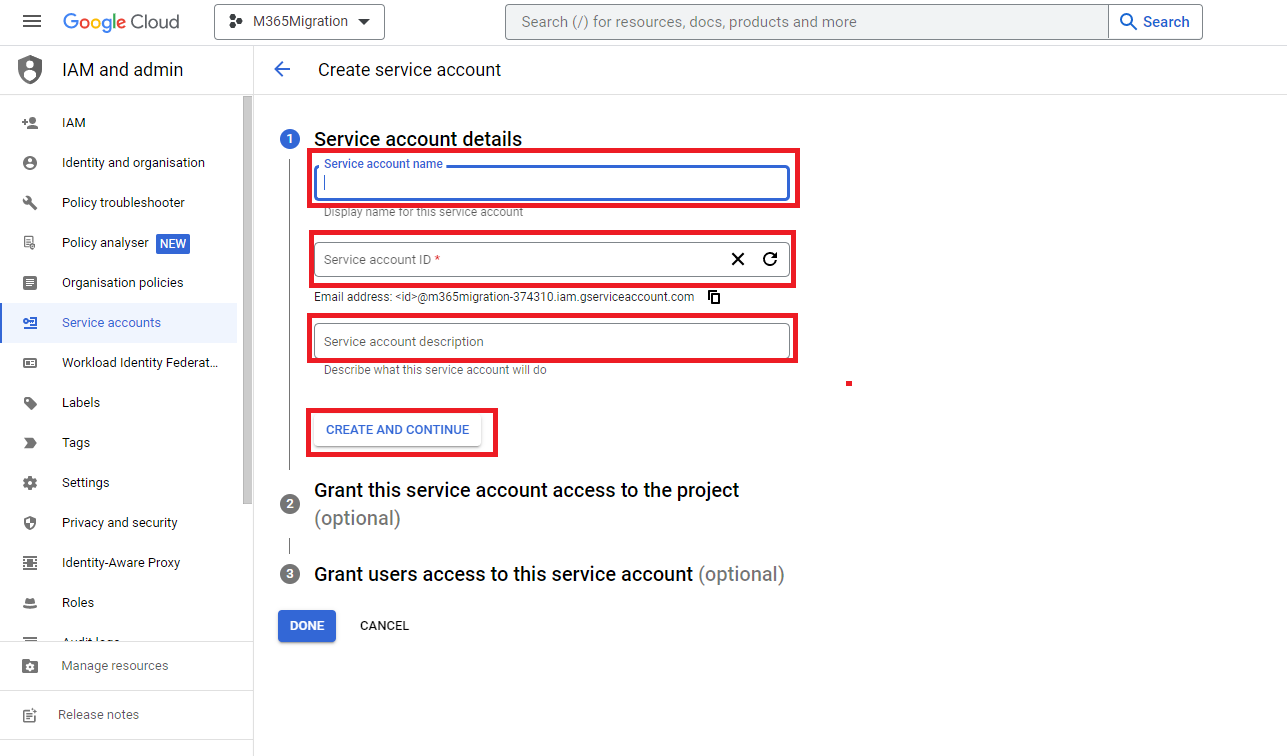
- Enter a Service Account Name and click the Create button.
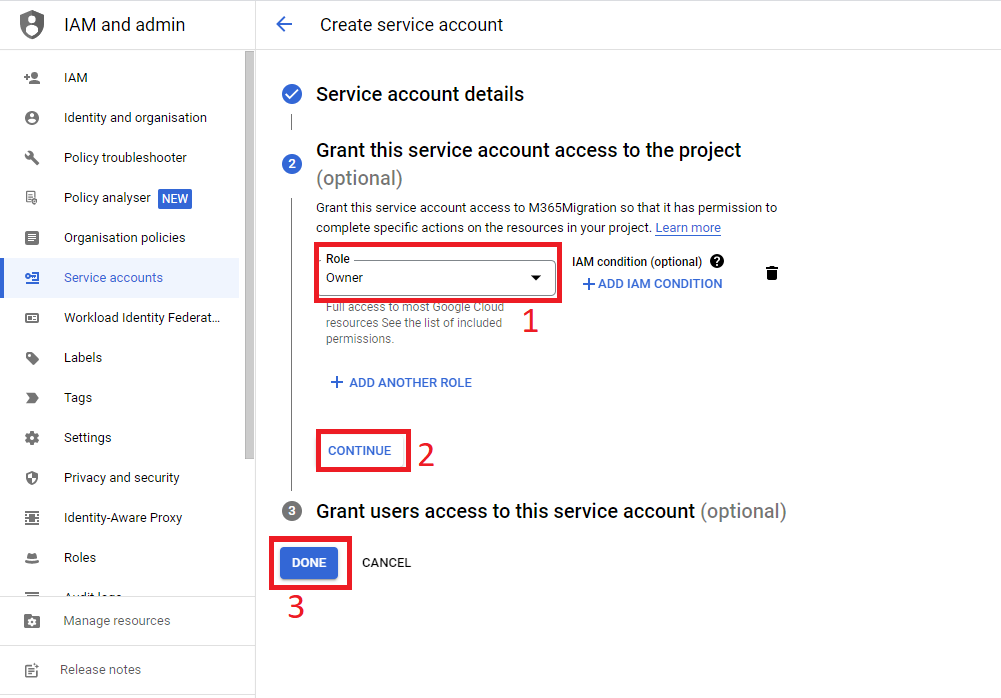
- In the next step, assign the Owner role and click Continue. Finally, click the Done button.
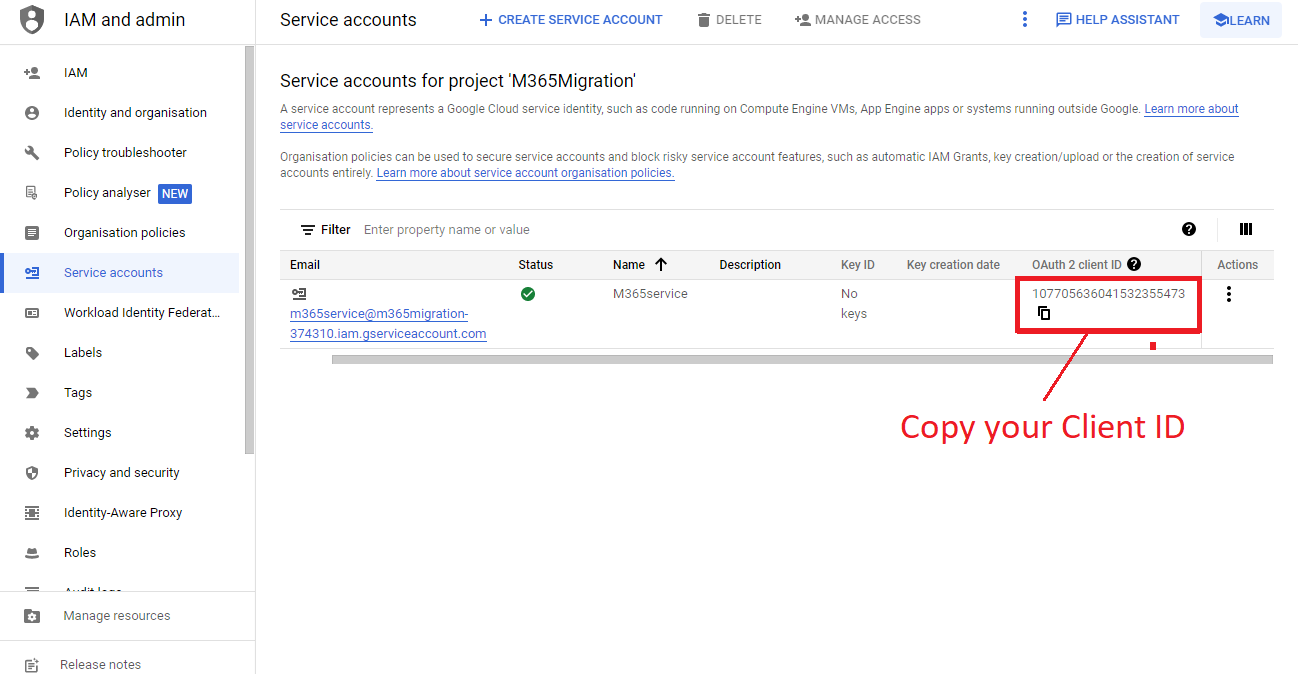
- Your service account will be created successfully, and a Client ID will be generated. Copy the Client ID and save it for future use.
Add Private JSON Key
- Next, you need to create a login credential key (JSON file). Click on your service account to begin creating a new key.
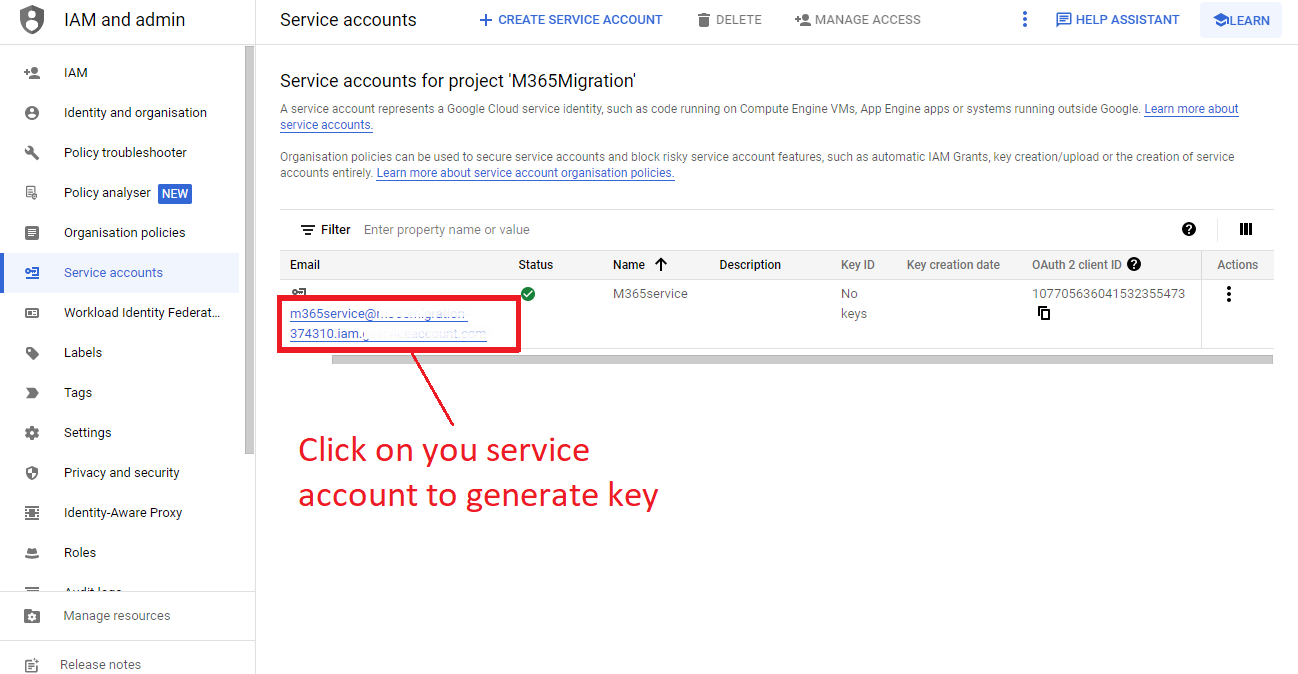
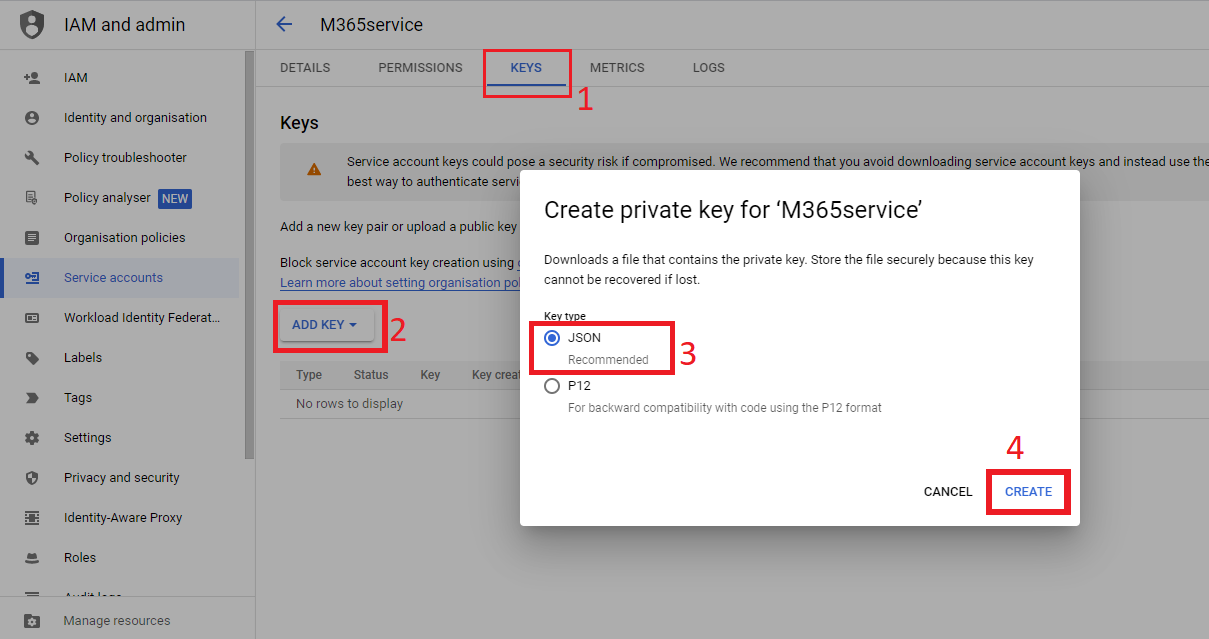
- Click on the KEYS tab and then choose Add Key.A pop-up will appear asking for the key type. Select JSON and click Create.
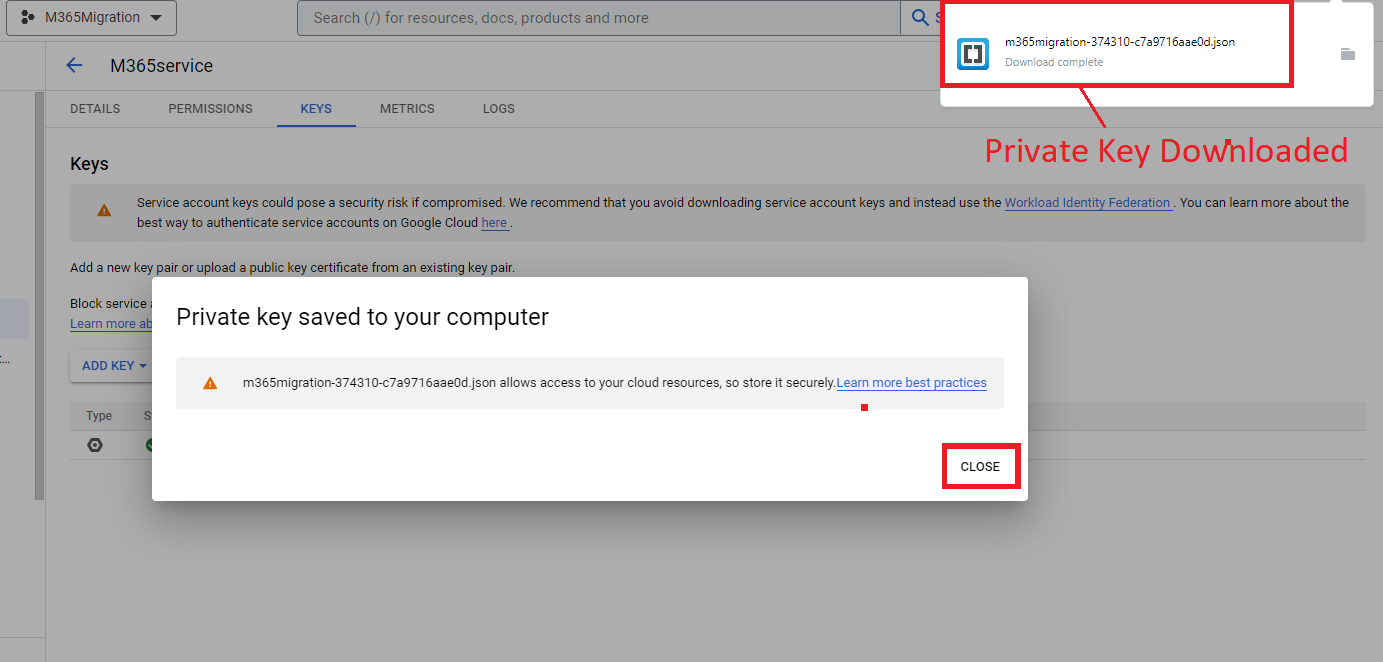
- Now you can see that the key will be generated and automatically downloaded to your computer.
Provide API Permissions
Now we need to grant API permissions to migrate from G Suite to Office 365. To grant API permissions for mail, contacts, and calendars, visit Google Cloud APIs. You’ll see an interface like the image below.
- Search for Gmail and click on the Gmail API.
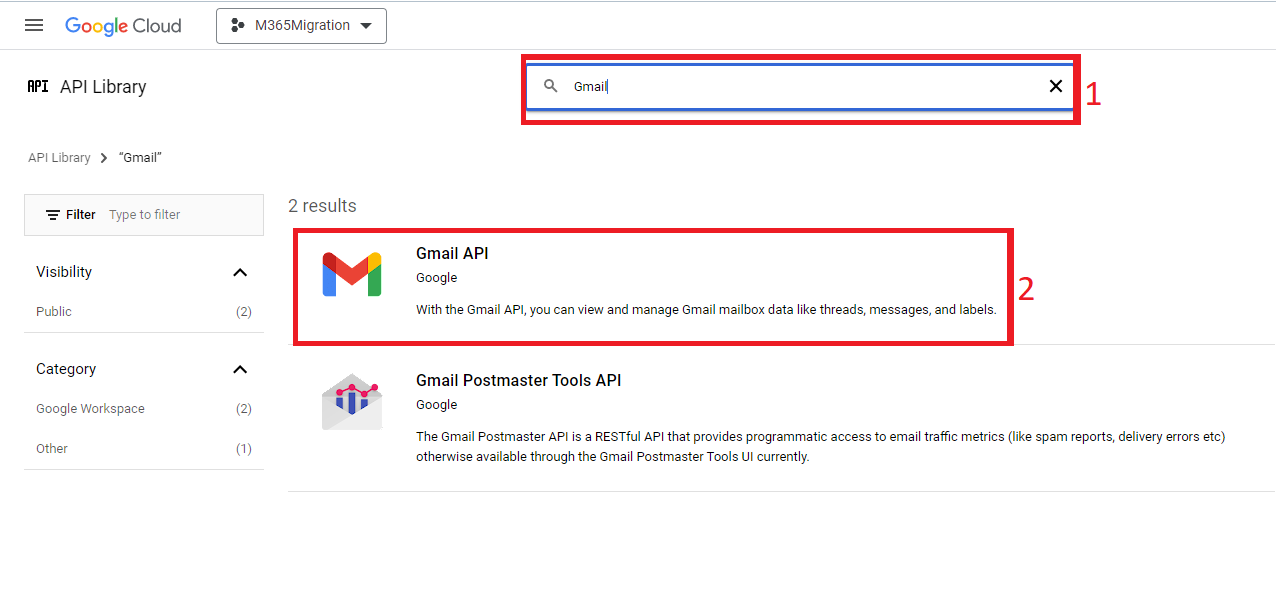
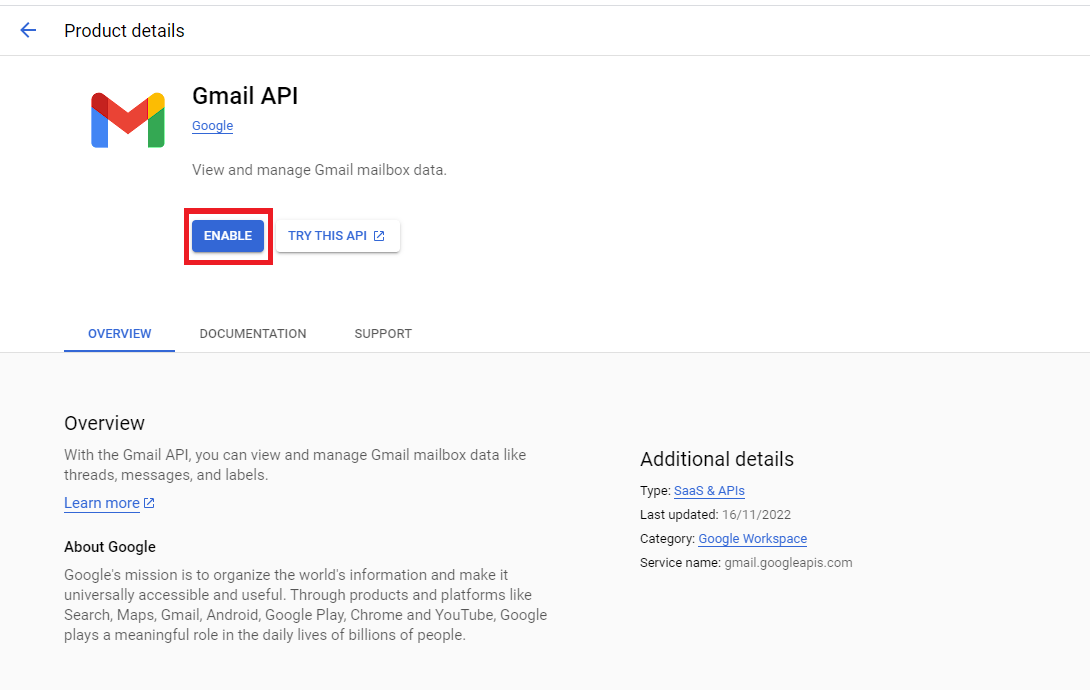
- Click the Enable button under the Gmail API.
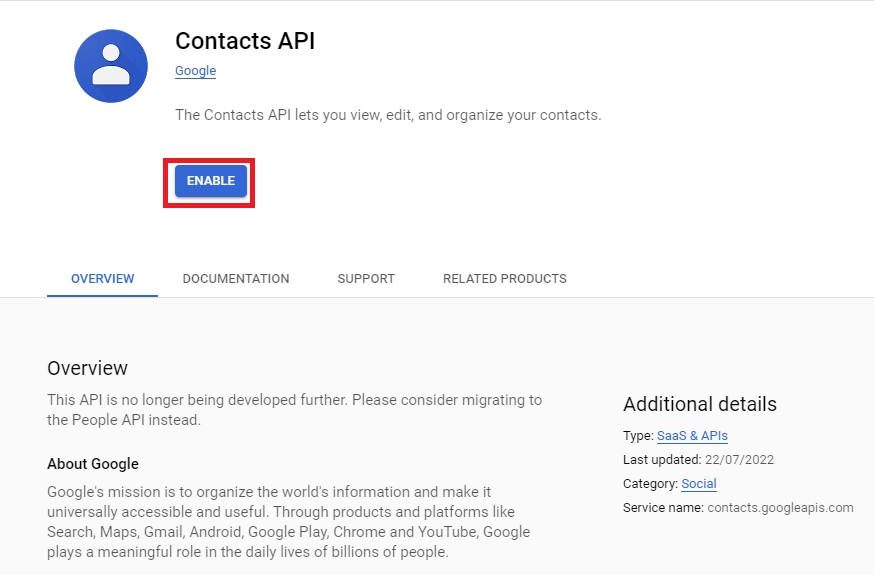
- Next, search for Contacts and enable the Contacts API, just like you did for Gmail.
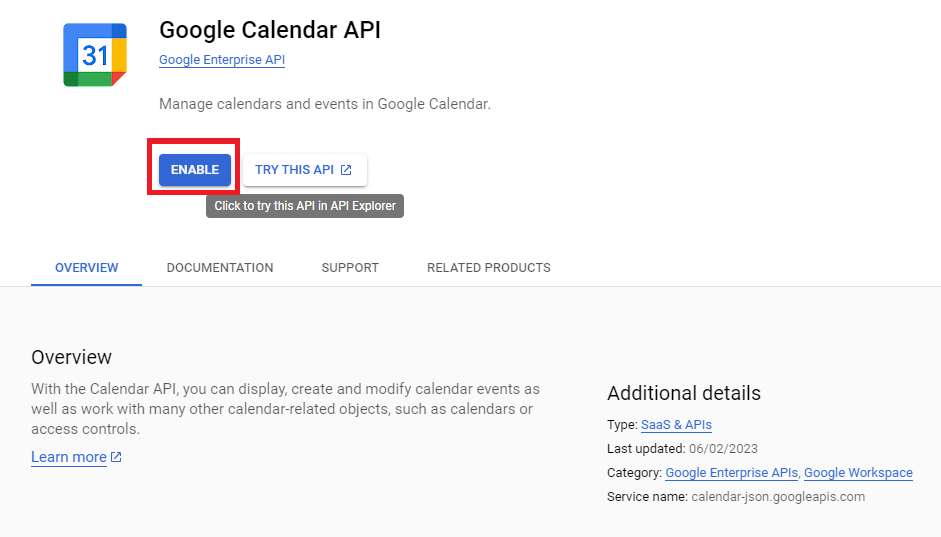
- After enabling Contacts, enable the Google Calendar API.
- Finally, search for People and enable the People API.
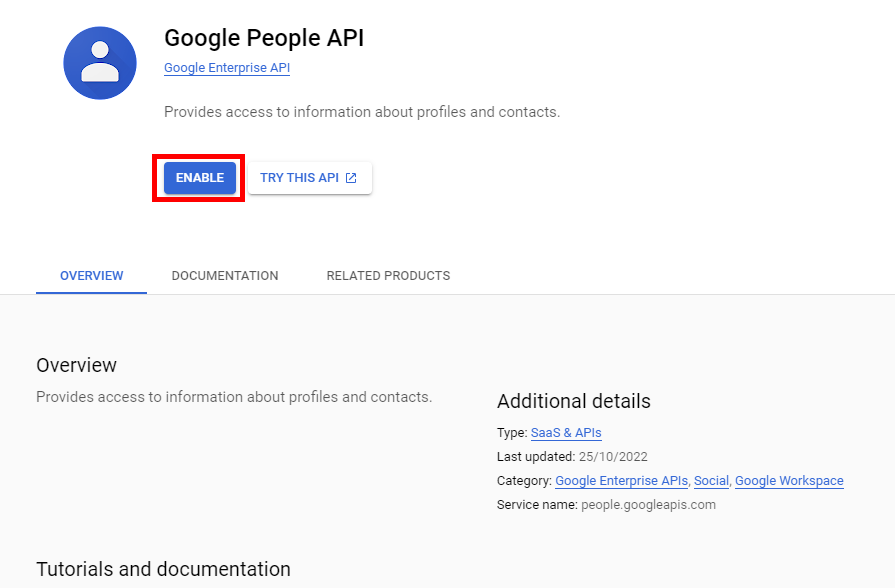
Add Domain-Wide Delegation
- Now, provide domain-wide delegation by visiting Google Admin Console and clicking the Add New button.
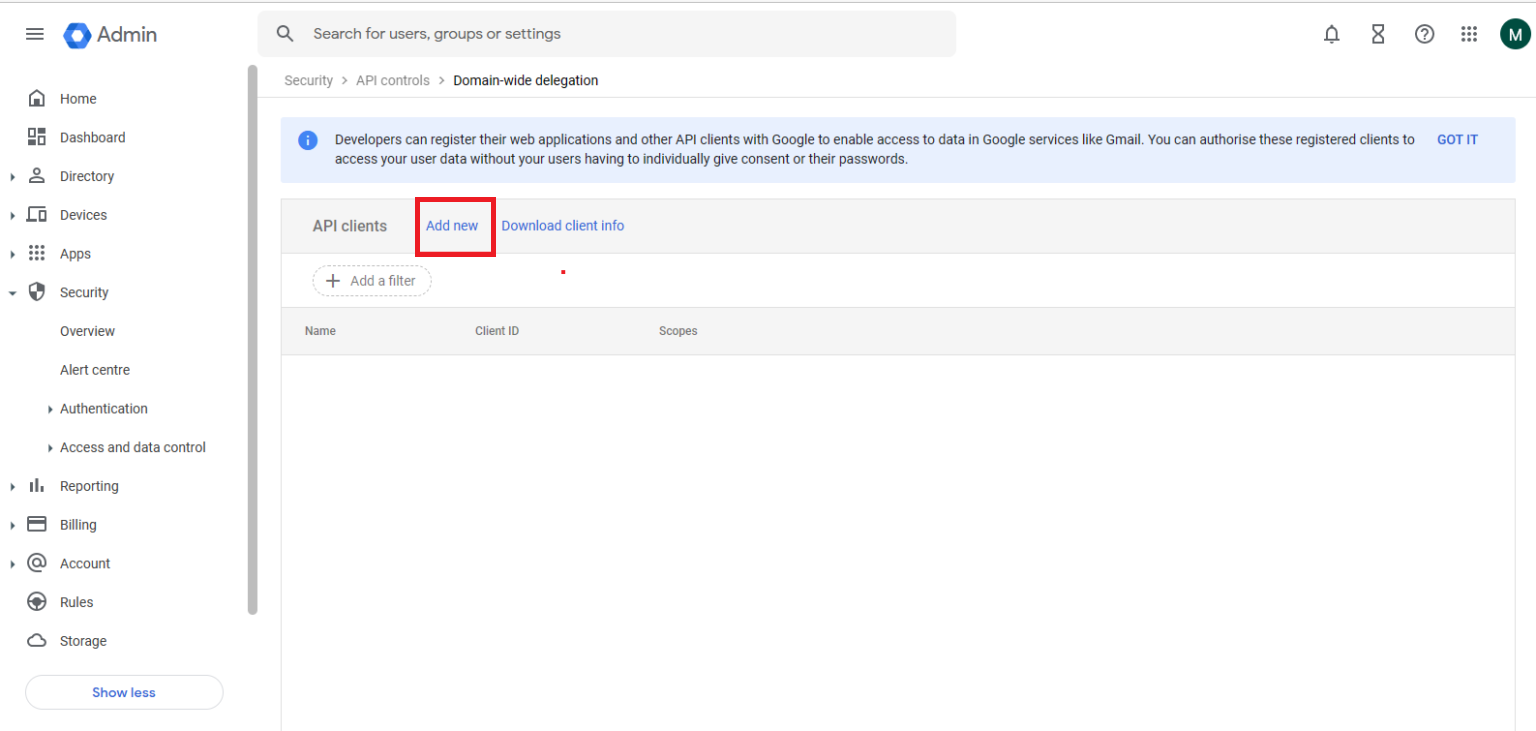
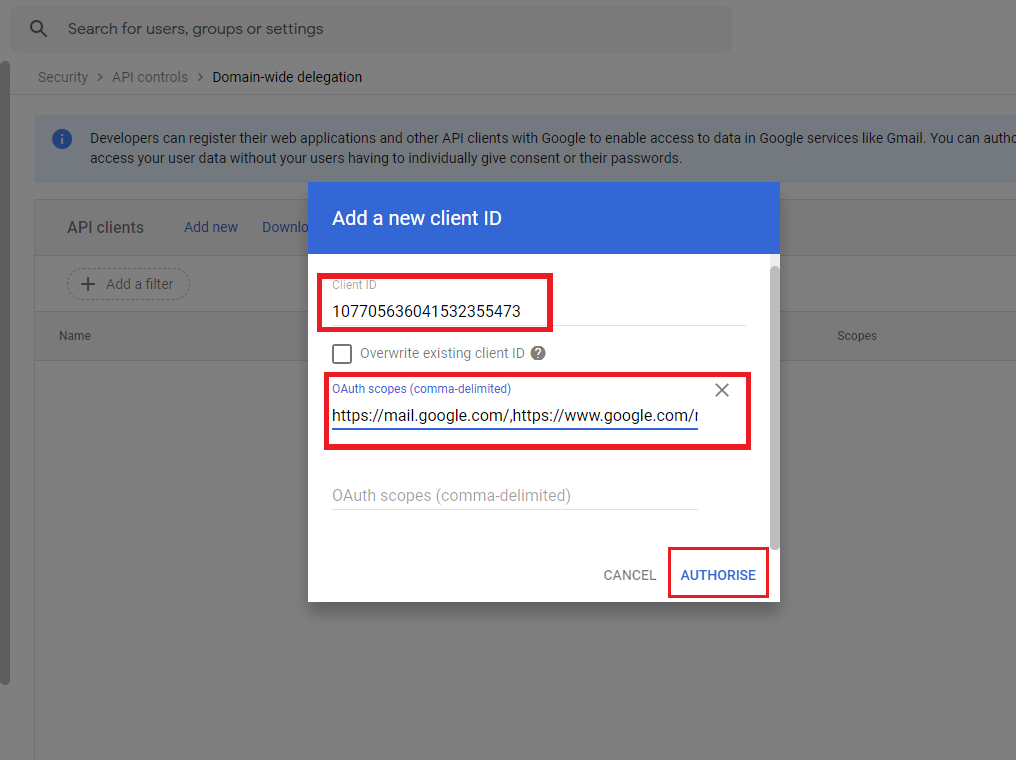
- Enter your Client ID and type the required scopes, then click the Authorize button.
https://mail.google.com,https://www.googleapis.com/auth/contacts,https://www.googleapis.com/auth/calendar,https:/www.googleapis.com/auth/gmail.settings.sharing, https://www.google.com/m8/feeds
- Once you’ve completed all these steps, return to the Microsoft 365 migration tab to continue.
Resume Google Workspace Migration Process
- Now that the prerequisites for G Suite to Office 365 migration are complete, click on the Next button to proceed.
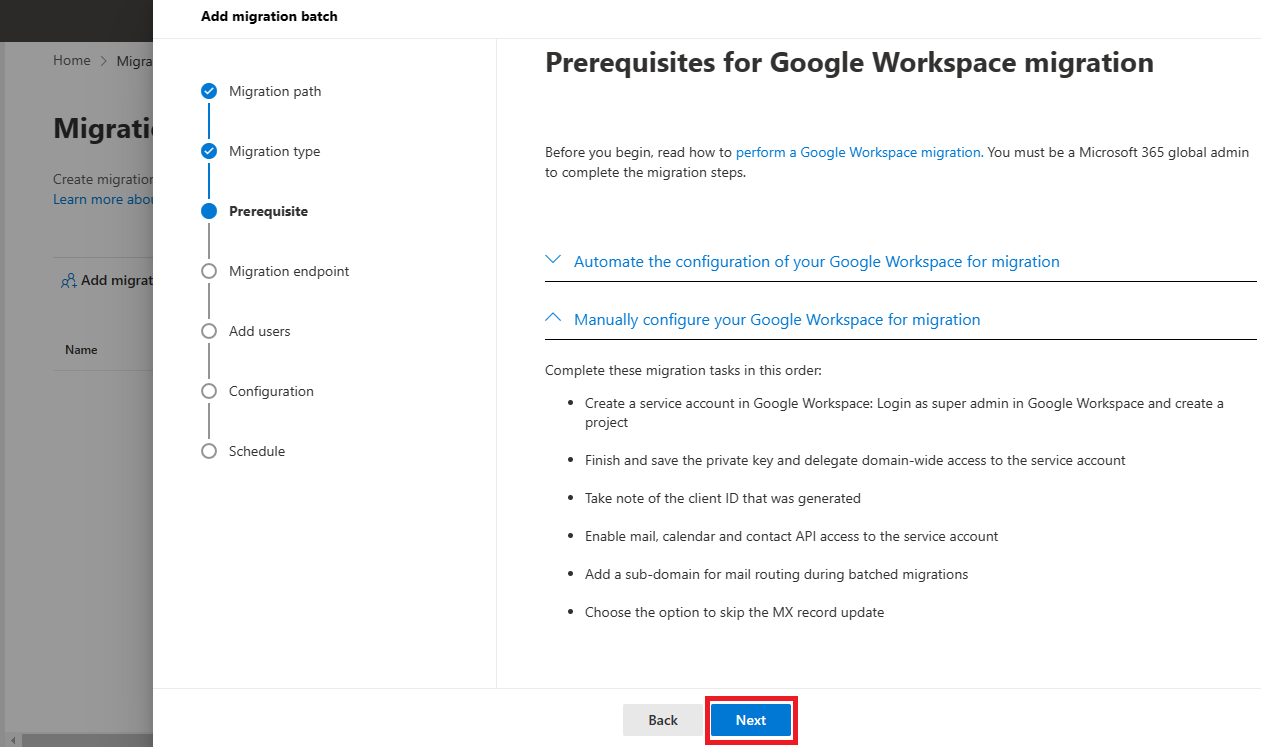
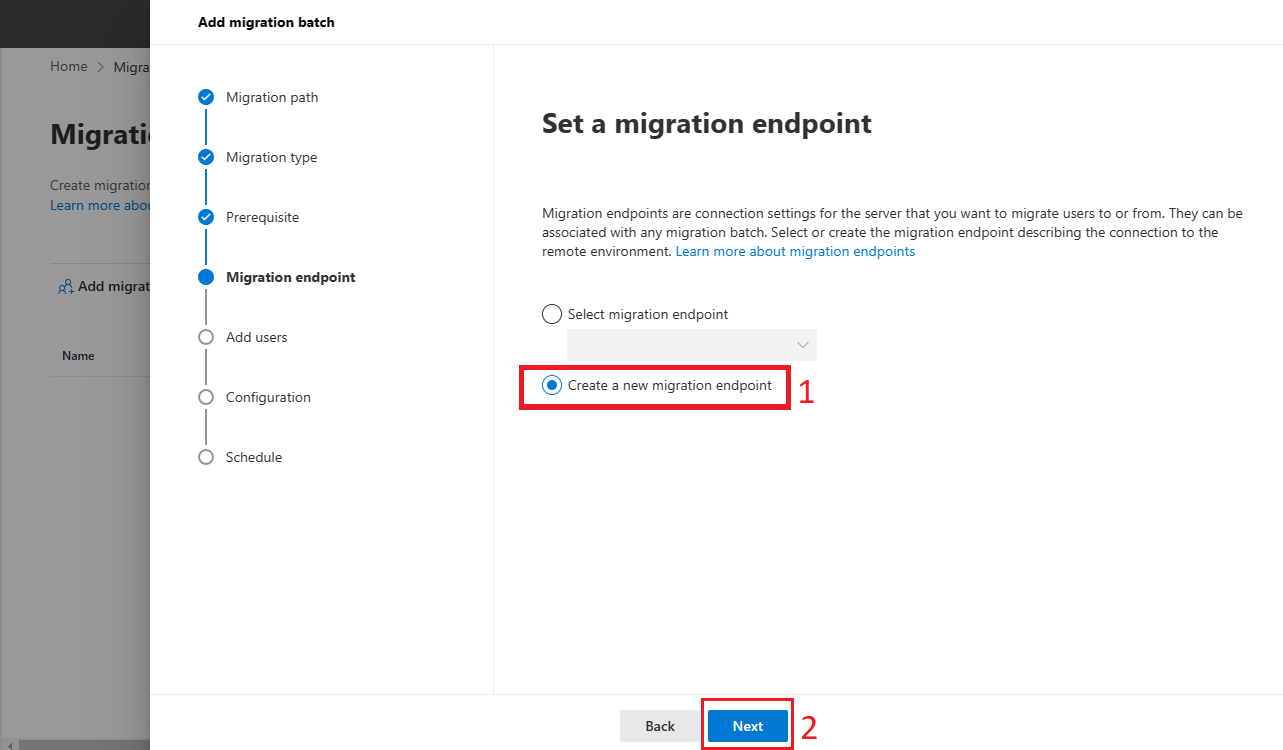
- Now Set a Migration Endpoint window will appear. Select Create a new migration endpoint and click Next.
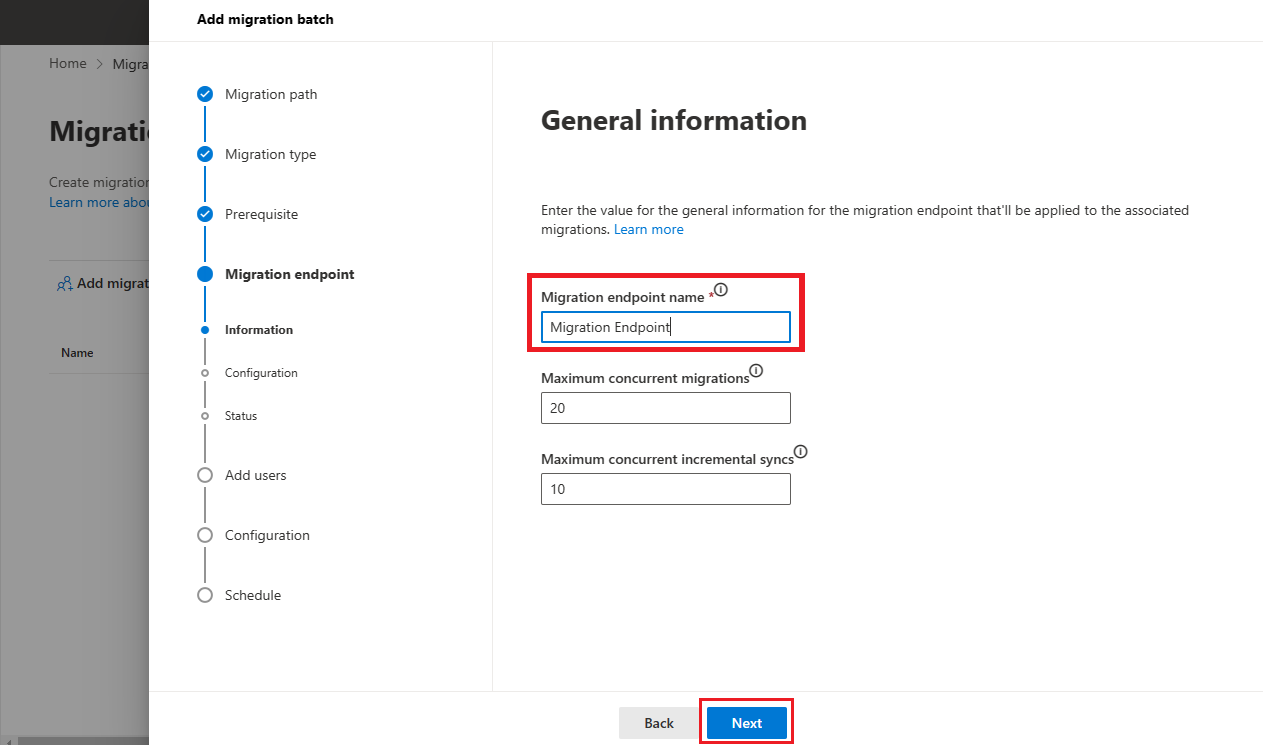
- In the General Information window, enter the Migration Endpoint Name and leave the other fields unchanged. Click Next.
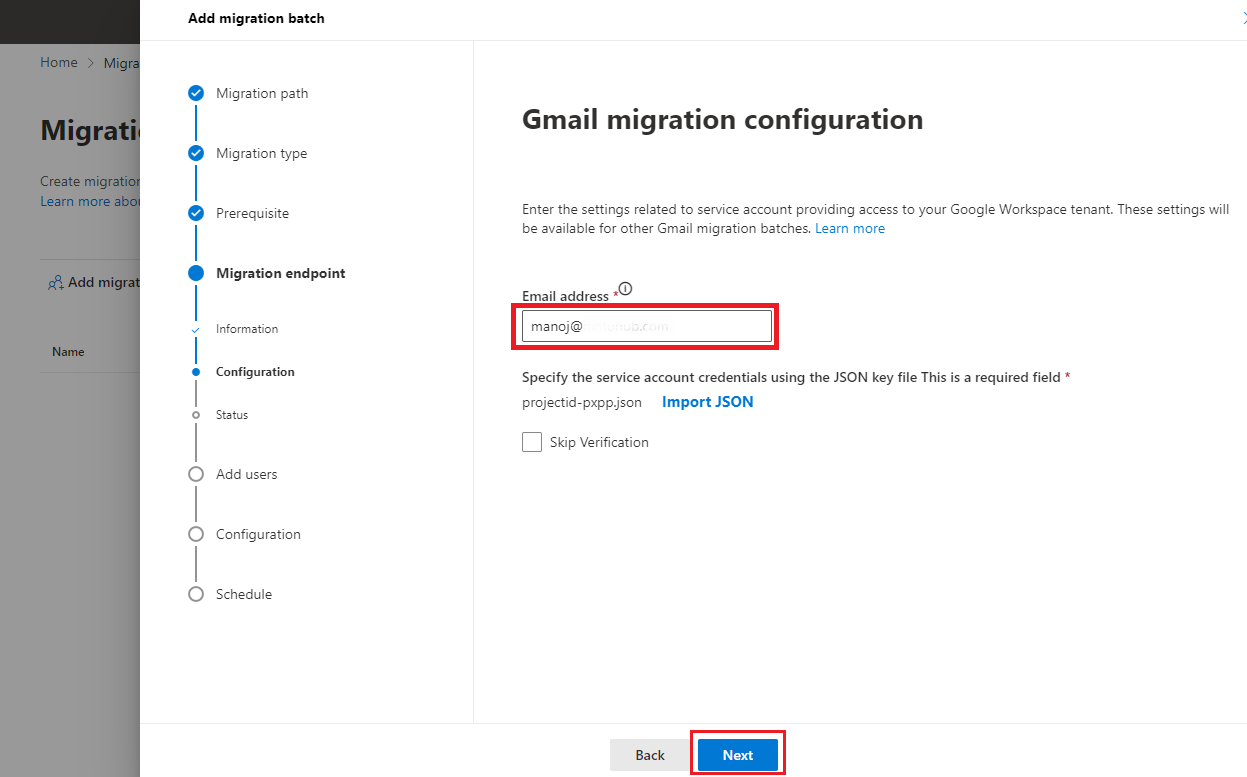
- The Gmail Migration Configuration window will open. Enter the email address of the Gsuite Admin account and import the JSON file you downloaded earlier. Click Next.
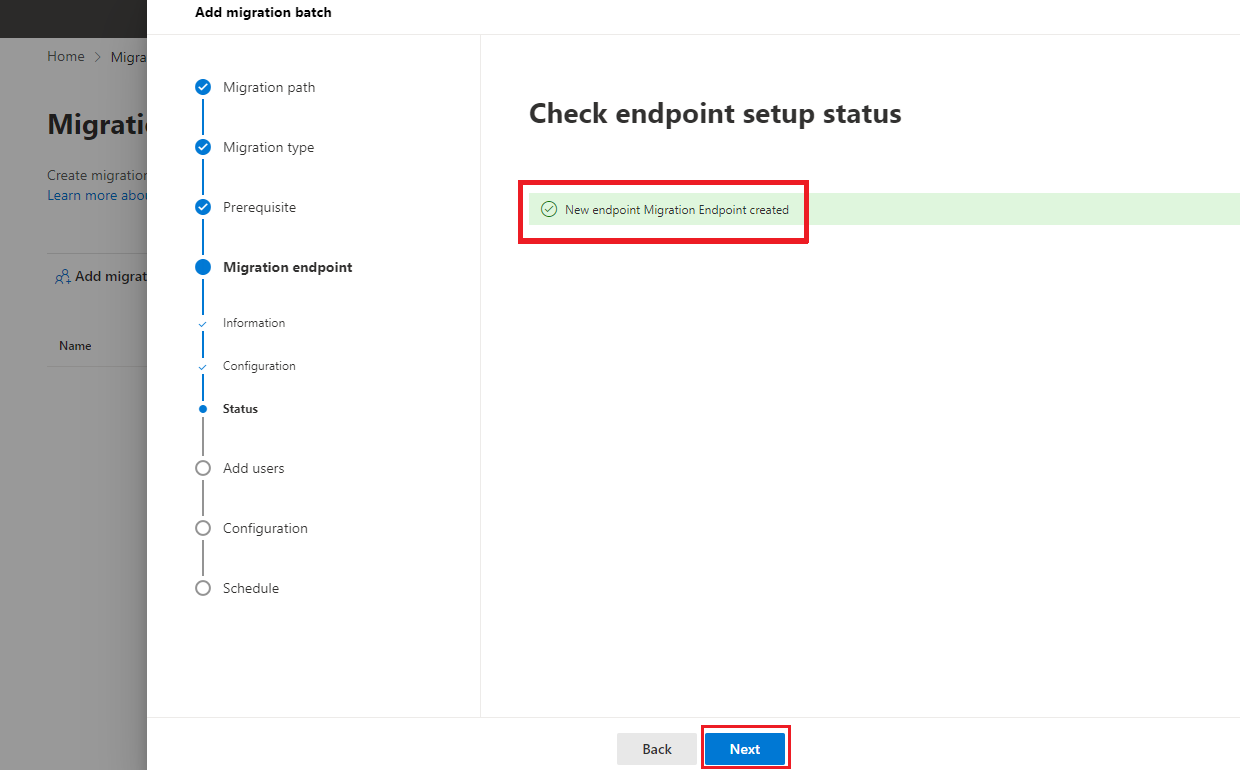
- You will see that the new migration endpoint is created successfully. Click Next to continue.
Create a CSV File
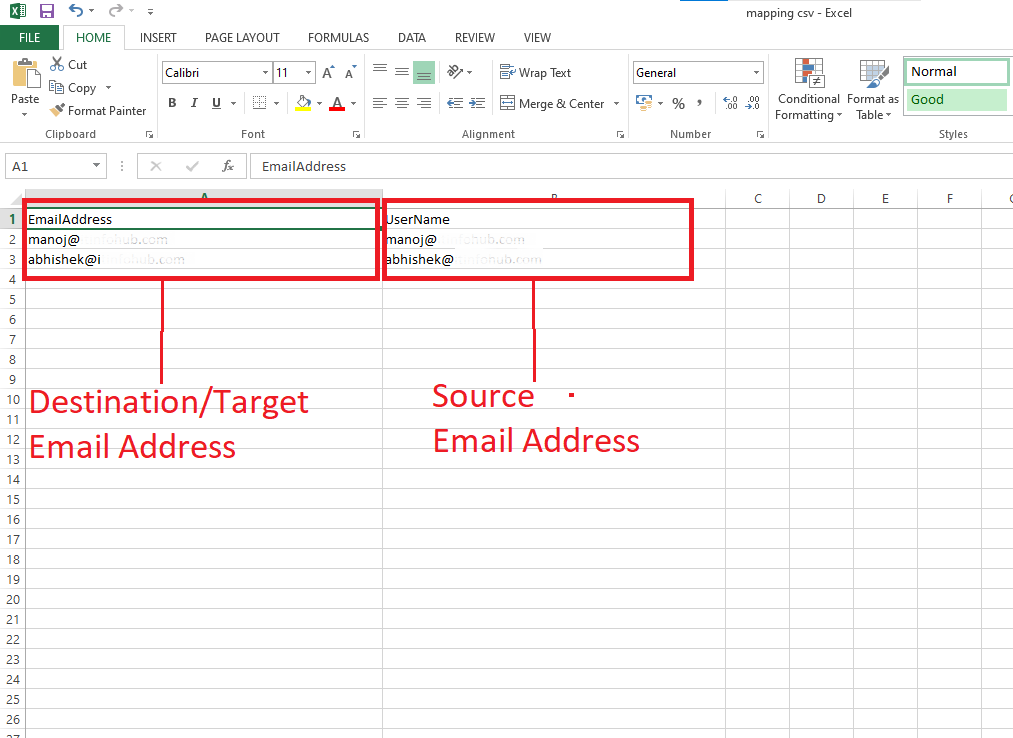
- Now, you need to create a CSV file for user mapping. Create a CSV file as shown in the example.
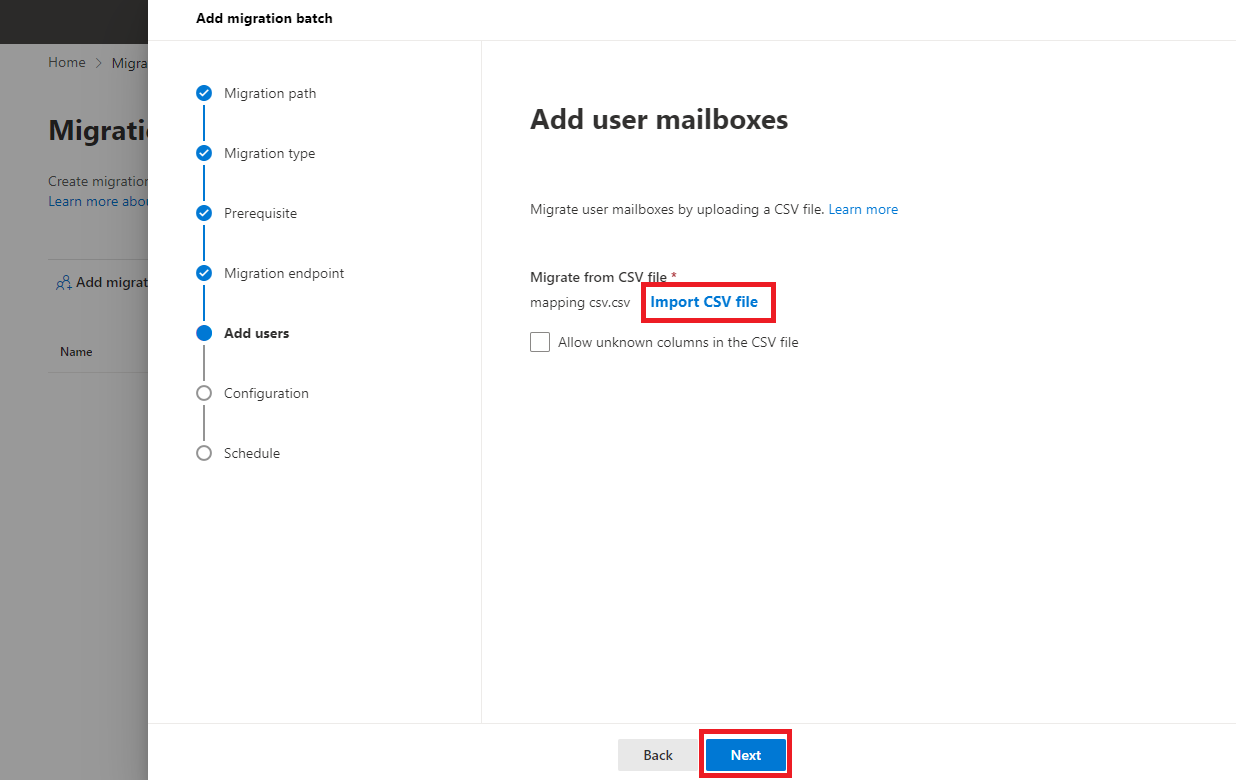
- Import your CSV file into this window and click Next to proceed.
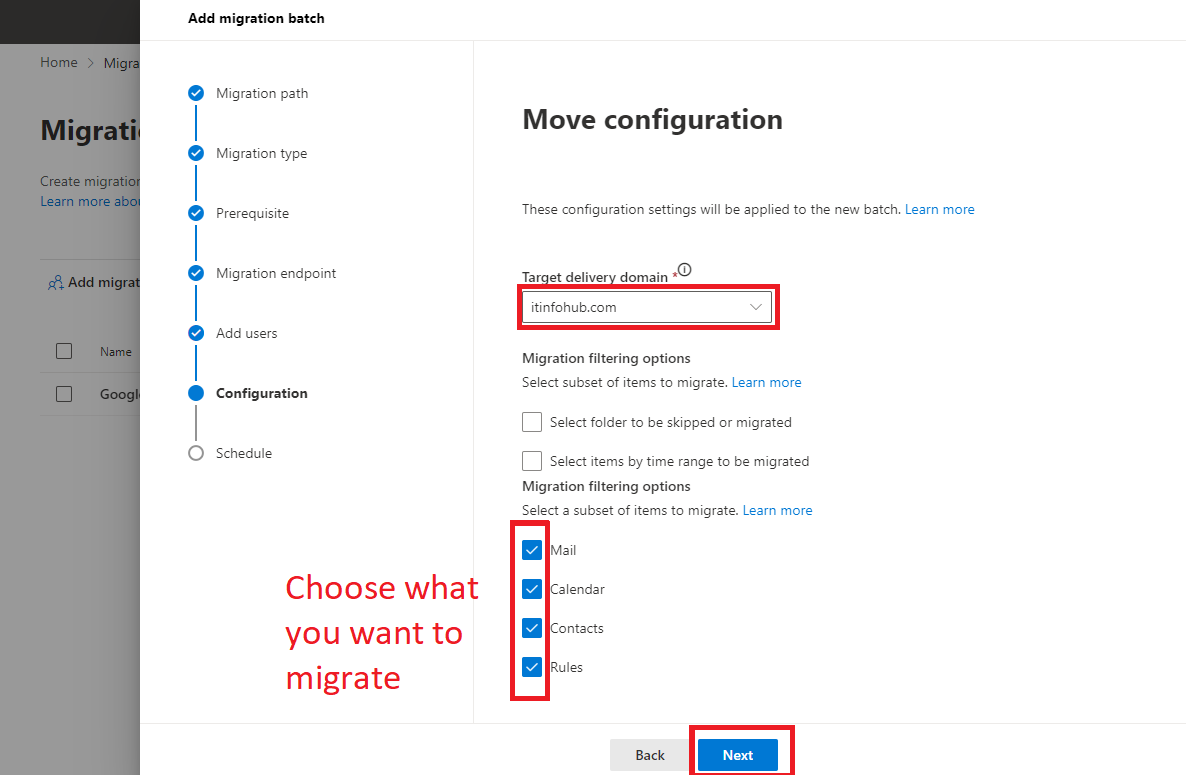
- In the Move Configuration window, enter the Target Delivery Domain, select the items you want to migrate, and click Next.
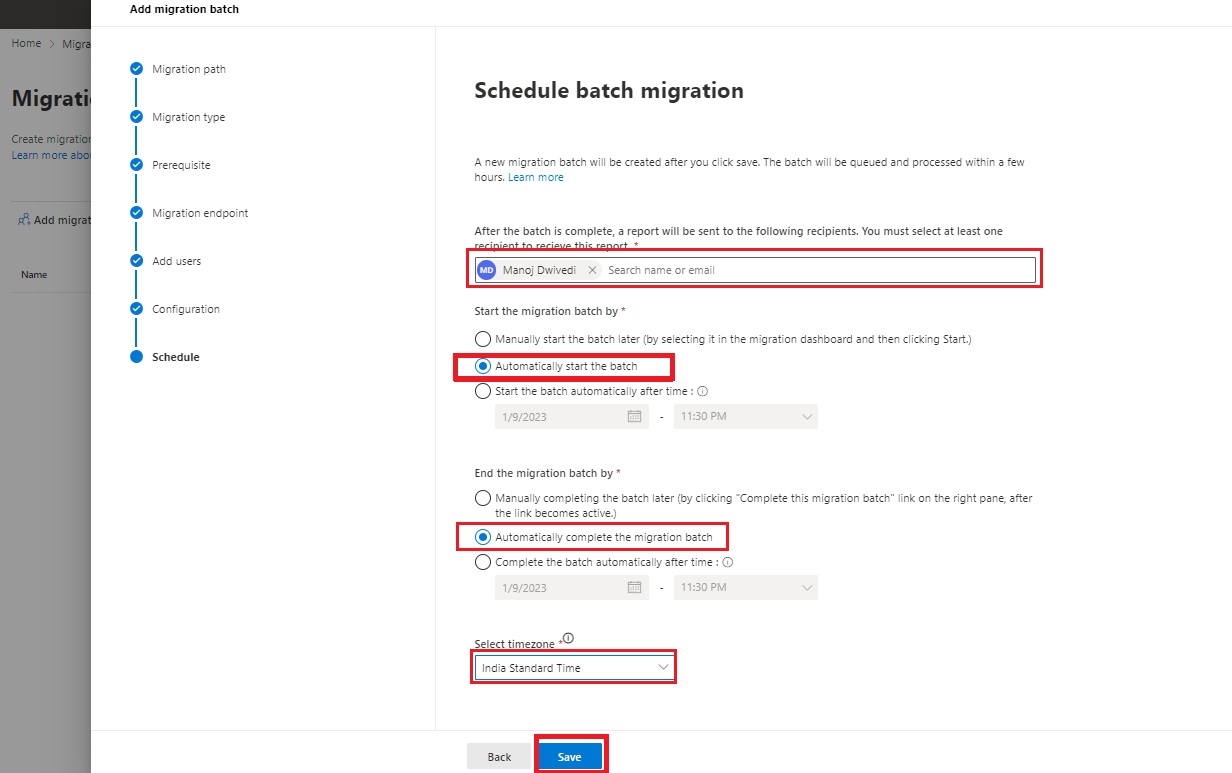
- The Schedule Migration Batch window will open. Select users for receiving the migration report. For Start the migration batch by, choose Automatically, and for End the migration batch by, choose Automatically. Select your time zone and click Save.
- The process will take some time, and you will see the status as Batch Creation Successful. Click Done to proceed.

- The migration batch will now be created, and the status will show as Syncing. Wait for the process to complete.
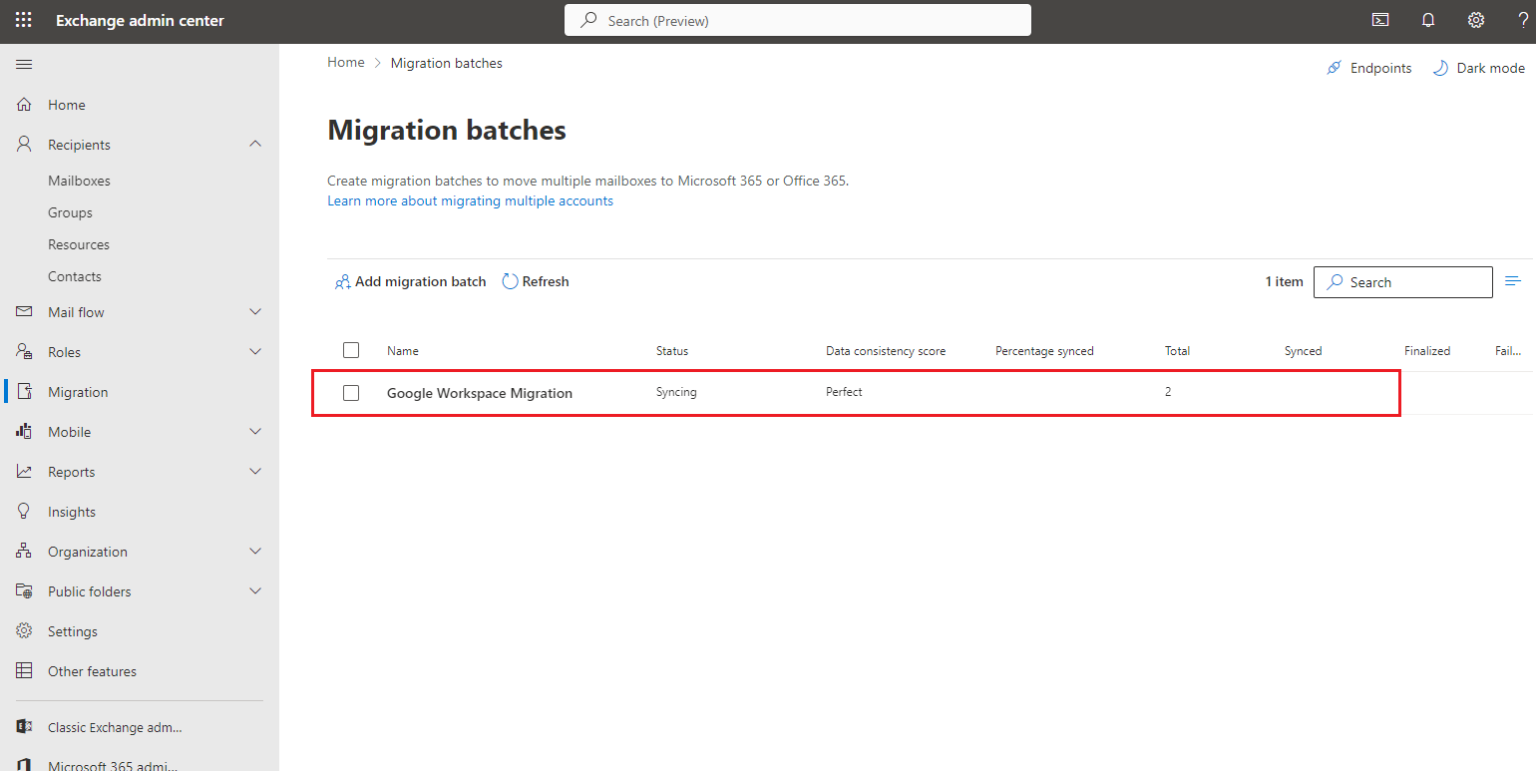
- After a while, click the Refresh button to check if the migration batch has synced. The status will change to Completed, although the duration depends on your data size.
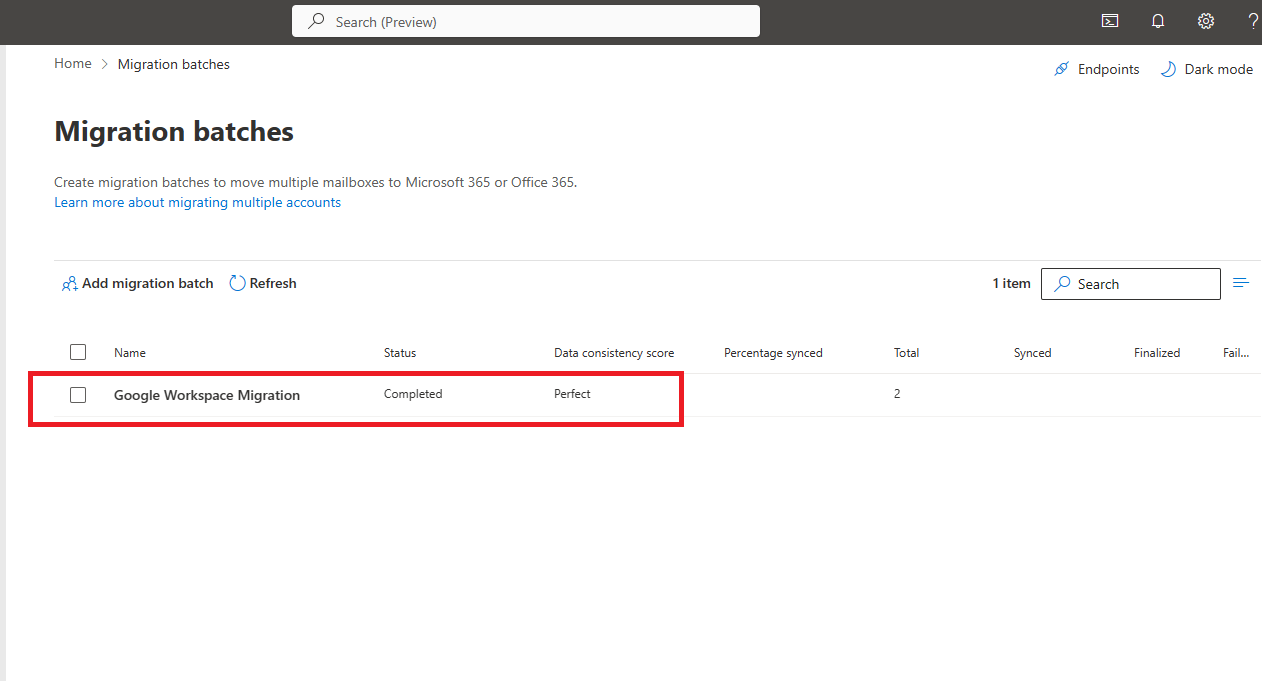
With this, we have successfully completed the google workspace to microsoft 365 migration. I hope this article has helped you understand how to perform the Google Workspace migration process.
Add MX Records for Sending/Receiving Emails
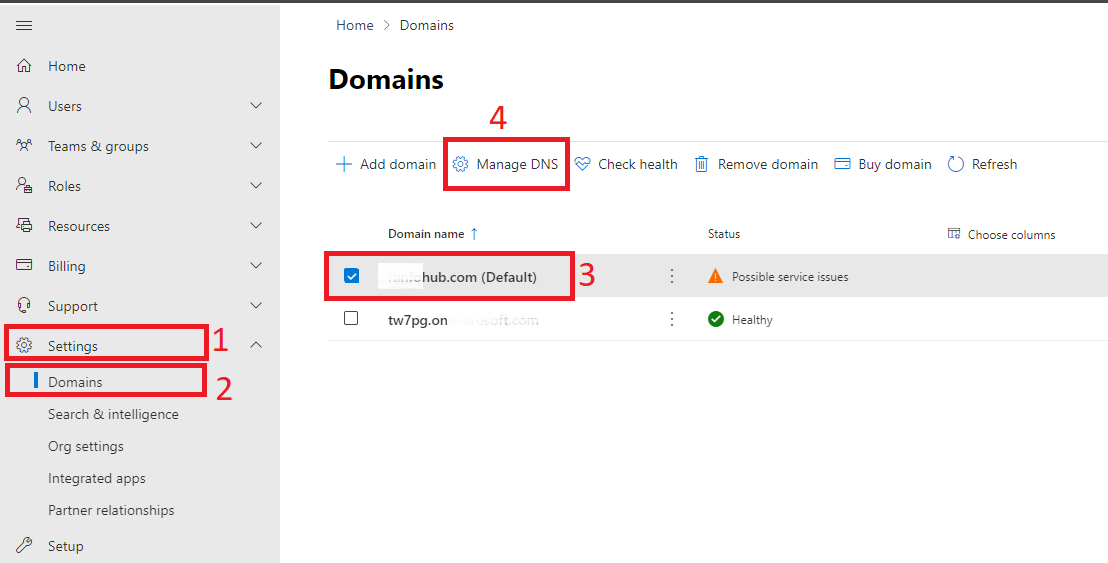
- Go to the Office 365 Admin Center, select Settings, then Domains. Choose your domain and click on Manage DNS.
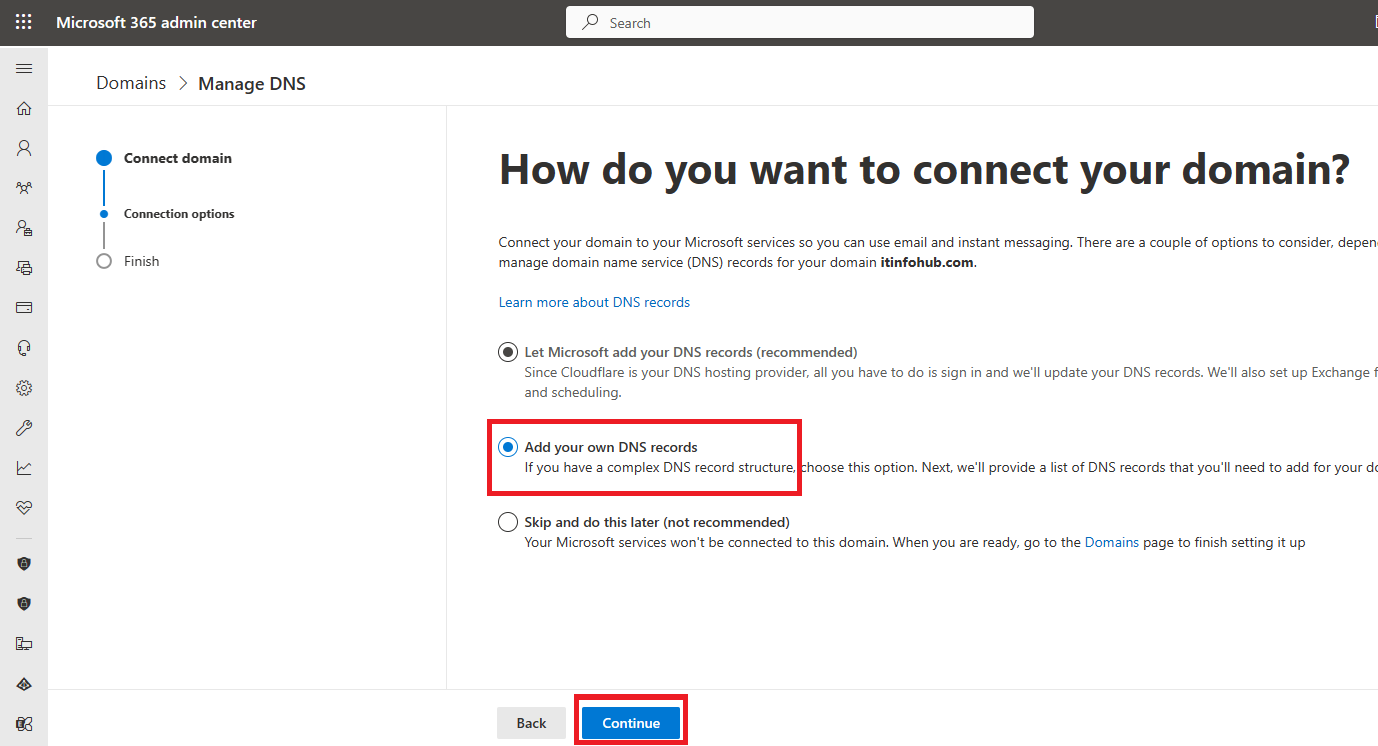
- You will be presented with two options to add DNS records for Exchange emails. Select Add your own DNS records. After choosing this option, click Continue.
- The required DNS values will be displayed. Add all the provided values to your domain and click Continue.
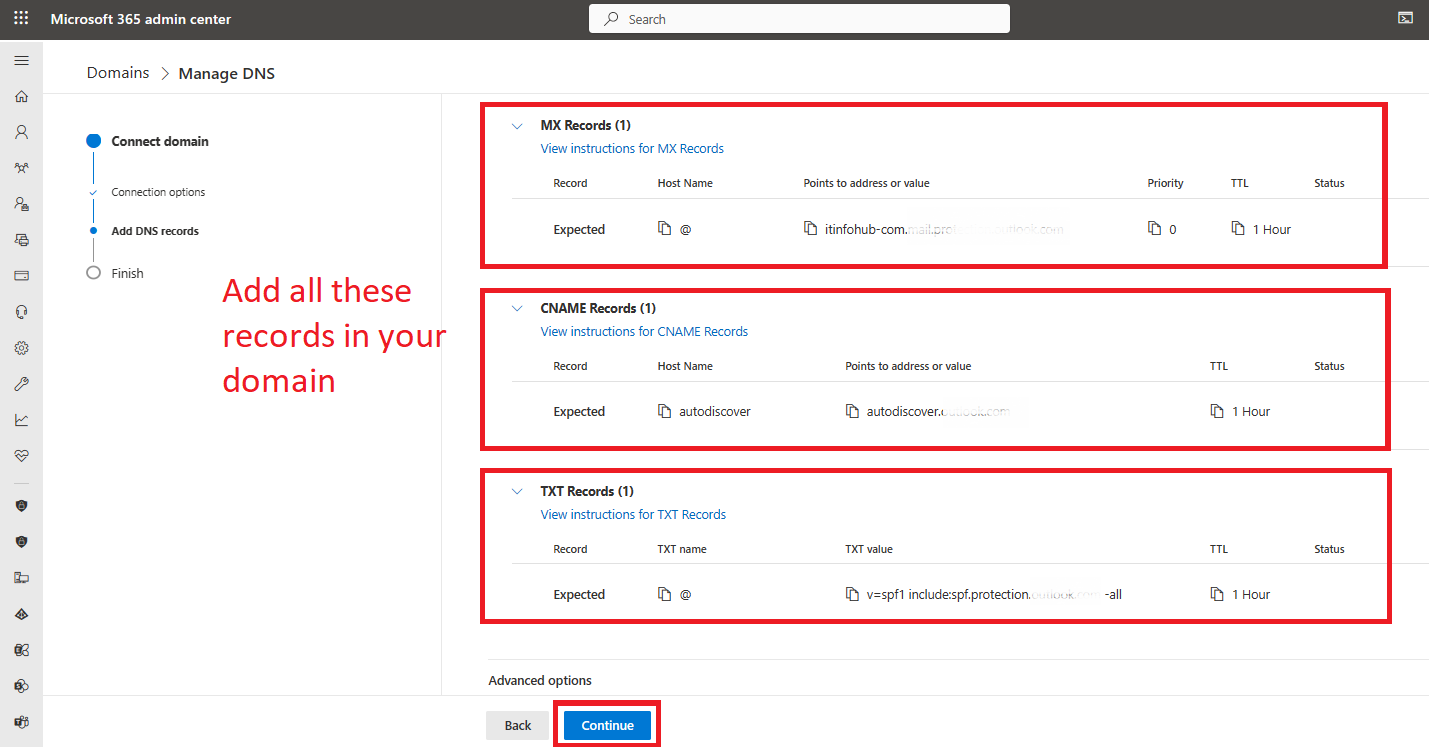
- The system will verify the details and complete the process.
By following this step-by-step migration procedure, you can easily migrate from Google Workspace to Office 365 and start receiving emails in your new Office 365 account.
Best Practices for Google Workspace to Microsoft 365 Migration
- Plan migration method based on data size and compatibility.
- Create and add users in bulk using Microsoft 365 Admin Center.
- Assign correct licenses to users before migration.
- Update DNS and MX records carefully for email migration.
- Monitor migration progress and resolve errors promptly.
- Verify data integrity and ensure all items are transferred accurately.
- Provide user training on Microsoft 365 post-migration.
- Decommission Gsuite after successful migration.
Conclusion
Google workspace to Office 365 migration can be a smooth process with the right steps. By following this step-by-step guide, you can easily add your domain to Microsoft 365, set up migration endpoints, and configure user details. Whether you opt for the automatic or manual method, ensuring the correct configurations will allow you to transfer your data and email services efficiently.
With careful planning, you can complete the migration and start enjoying the productivity and collaboration features of Microsoft 365. Follow the guide to ensure your Google Workspace to Microsoft 365 migration is hassle-free, and get ready to make the most of your new Office 365 environment.
FAQ
Q1. Can I migrate all my data from Google Workspace to Microsoft 365?
Ans. Yes, you can migrate emails, contacts, calendars, and other data from Google Workspace to Microsoft 365 using migration tools available in the Exchange Admin Center.
Q2. How long does it take to migrate from Google Workspace to Office 365?
Ans. The time it takes depends on the amount of data being transferred, but it usually ranges from a few hours to a few days.
Q3. Do I need to manually configure DNS records for email migration?
Ans. Yes, after the migration process, you will need to add the appropriate MX records to your domain in the Office 365 Admin Center to enable email sending and receiving.
Q4. How do I migrate from Google Workspace to Office 365?
Ans. Use the Exchange Admin Center in Microsoft 365, select the Google Workspace (Gmail) migration type, and follow the steps to import your emails and other data.
Q5. Do I need to reconfigure my Google Workspace settings after migration?
Ans. Once the migration is complete, ensure that the DNS settings are updated, and check that all data has been transferred properly. You may also need to update your Gsuite configurations for a seamless experience.
