In Office 365, the distribution lists allow you to send emails to various recipients using a single email account. This feature helps us to simplify email communication within an organization by allowing users to send emails to select groups or individuals with a single click. Every administrator must be able to add members to a distribution list. In this article, we explain how to add-distributiongroupmember to an Office 365 distribution list.
Table of Content
Methods to Add-DistributionGroupmember in Office 365
The members are added in a distribution group through microsoft office 365 admin center and also using windows powershell. Both approaches are explained step by step.
Adding Members with the help of Admin center in Distribution List:
- Visit microsoft.com and log in using your admin credentials.
- Navigate to Teams and Groups and select Active Teams and Groups. In the Active Teams and Groups window, click on Distribution Lists.

- Select the specific distribution list where you want to add members. Then, click on the Members tab and choose View All and Manage Members.

- On the Members page, click Add Members to include one or multiple members.
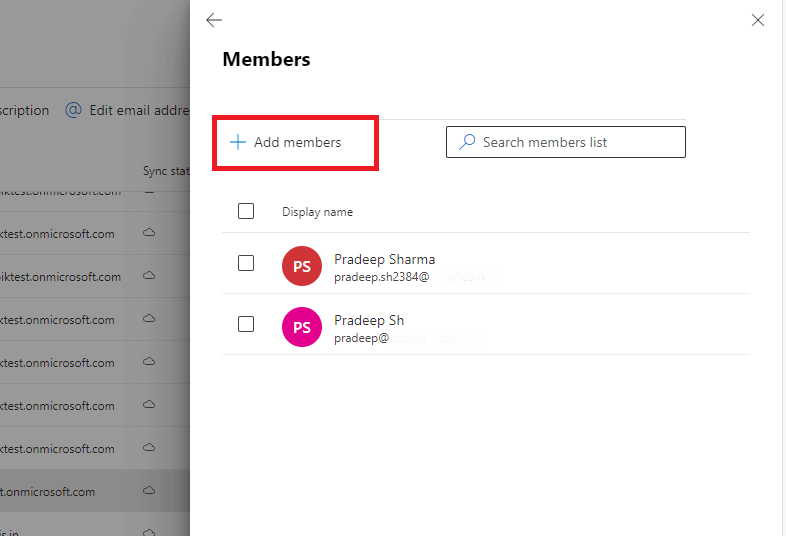
- Search for the desired member(s), select them, and click the Add button to finalize.
Add-DistributionGroupmember via PowerShell
As an Office 365 administrator, you can use Windows PowerShell to add members to a distribution group. This is done with the Add-DistributionGroupMember command.
1. Begin by connecting to Exchange Online using the following command.
Command- Connect-ExchangeOnline
Adding a Single Member to a Distribution List
To add an individual member to a distribution group, execute the following command in PowerShell.
Command- Add-DistributionGroupMember –Identity [group name / group mail address] -Member [user mail address]
For Example
Add-DistributionGroupMember -identity “Testing” -Member “[email protected]”
Adding Multiple Members to a Distribution Group via PowerShell
To add multiple members, prepare a .txt file that contains the email addresses of the members.
- Create a .txt file formatted as shown in the example below.

- After preparing the .txt file, execute the following command in Windows PowerShell.
$GroupEmailID = "[email protected]"
 $CSVFile = "C:\Users\dell\Desktop\groupmembers.txt"
 #Connect to Exchange Online
Connect-ExchangeOnline -ShowBanner:$False
 #Get Existing Members of the Distribution List
$DLMembers =  Get-DistributionGroupMember -Identity $GroupEmailID -ResultSize Unlimited | Select -Expand PrimarySmtpAddress
 #Import Distribution List Members from CSV
Import-CSV $CSVFile -Header "UPN" | ForEach {
    #Check if the Distribution List contains the particular user
     If ($DLMembers -contains $_.UPN)
    {
        Write-host -f Yellow "User is already member of the Distribution List:"$_.UPN
   }
     Else
    {
        Add-DistributionGroupMember –Identity $GroupEmailID -Member $_.UPN
        Write-host -f Green "Added User to Distribution List:"$_.UPN
    }
 }
Add-DistributionGroupmember to Multiple Distribution Lists
Adding members to multiple distribution lists individually can be time-consuming, as it requires creating separate .txt files for each list. However, this process can be streamlined using Windows PowerShell. Follow the steps outlined below.
- Create a CSV file containing the group email addresses and the corresponding members, formatted as shown in the example below.

- Once the CSV file is ready, execute the following command in PowerShell to add members to multiple distribution groups.
$CSVFile = "C:\Users\dell\Desktop\groupmembers.csv"
Try {
     #Connect to Exchange Online
 Connect- ExchangeOnline -ShowBanner:$False
  #Get date from CSV File
 $CSVData = Import-Csv -Path $CSVFile
     #Iterate through each row in the CSV
 ForEach($Row in $CSVData)
   {
     #Get the Distribution Group
   $Group = Get-DistributionGroup -Identity $Row.GroupEmails
    If($Group -ne $Null)
    {
       #Get Exisiting Members of the Group
   $GroupMembers = Get-DistributionGroupMember -Identity $Row.GroupEmails -ResultSize Unlimited | Select -Expand PrimarySmtpAddress
 #Get Users to Add to the Group
     $UsersToAdd =  $Row.Users -split ","
   #Add Each user to the Security group
 ForEach ($User in $UsersToAdd)
  {
  #Check if the group has the member already
     If($GroupMembers -contains $User)
         {
         Write-host "'$($User)' is already a Member of the Group '$($Group.DisplayName)'" -f Yellow
             }
            Else
           {
               Add-DistributionGroupMember –Identity $Row.GroupEmails -Member $User
              Write-host -f Green "Added Member '$User' to the Group '$($Group.DisplayName)'"
             }
           }
        }
        Else
        {
            Write-host "Could not Find Group:"$Row.GroupName
        }
    }
}
 Catch {
    write-host -f Red "Error:" $_.Exception.Message
}
Use Windows PowerShell to efficiently manage and automate tasks, such as adding members to distribution groups in Office 365.x
How to Remove Multiple Users from a Distribution Group?
Removing multiple users in a distribution list is the same as the adding process to the distribution list. To remove multiple users, you can use the below code.
Connect-ExchangeOnline
 Import-CSV <FilePath> | foreach {
 $UPN=$_.UPN
 Write-Progress -Activity "Removing $UPN from the group…" Remove-DistributionGroupMember -Identity <GroupUPN> -Member $UPN
If ($?) {
 Write-Host "$UPN Successfully removed" -ForegroundColor Green
}
 Else {
 Write-Host "$UPN - Error occurred" -ForegroundColor Red
}
 }
Conclusion
In Office 365, the distribution groups help us to simplify the email communication between administrators and recipients. Also, it helps to allow the administrators to send messages to multiple recipients using a single email address.
To add-distributiongroupmember to these groups, administrators can either use the Microsoft 365 Admin Center, which offers a straightforward, user-friendly interface for adding individuals or groups, or leverage Windows PowerShell for bulk operations.
PowerShell is particularly useful for adding multiple members efficiently, especially when managing large groups or multiple distribution lists. Both approaches offer flexibility, allowing administrators to keep distribution lists up to date.
